VPS Tutorial
Update August 2025: This tutorial will be replaced soon with a new version based on DirectAdmin instead of Virtualmin.
This tutorial is about setting up and managing a Virtual Private Server (VPS) for hosting websites and email. It is aimed at people who are considering moving from shared web hosting to VPS or cloud hosting (or even a dedicated server) in order to improve the speed and reliability of their sites, or moving from managed to unmanaged hosting to save cost. By managing the server yourself with the aid of an open-source control panel such as Virtualmin you can save a lot of money while avoiding most of the restrictions of shared hosting.
The same instructions can be used to set up a test server that runs in a window on your own local computer (Mac, Windows or Linux) using Hyper-V, VirtualBox or VMWare, or on a spare PC or laptop.
- VPS Tutorial
- Introduction
- Getting started
- Choosing a hosting company
- Choosing an operating system and control panel
- Installation
- Connecting to the secure shell
- Additional packages
- Apache configuration
- MariaDB configuration
- Networking
- Additional security
- DNS configuration
- Configuring outgoing email
- Configuring incoming mail
- Replacing Apache with nginx
- Replacing Apache with OpenLiteSpeed
- Installing web sites
- Testing and monitoring
- Tuning performance and memory usage
- Backups
- A final word about security
- References
Introduction
Managing your own VPS has some big advantages:
- Web pages typically load faster and more reliably than on shared hosting.
- You can resolve problems quickly and access log files without waiting for a support ticket to be answered.
- You have complete control – install any software package you want and any number of websites or email accounts.
- Secure shell (SSH) access allows fast secure file transfers, remote backups and command-line control.
- Full isolation from other users greatly reduces your vulnerability to being hacked, or your IP address being blacklisted.
- You can give private accounts to friends or customers.
- You avoid expensive management fees and control panel licenses.
- It’s easier to move everything to an upgraded server or backup server if necessary.
- You gain a lot of knowledge about how web servers work.
Some disadvantage are:
- A VPS is typically more expensive than “free” or “shared” hosting.
- Some technical ability is needed, and time to learn server management skills.
- Some regular effort is needed to monitor and maintain the server to keep it secure and reliable.
- Although you have guaranteed minimum resources (RAM, CPU, disk space, bandwidth) on a VPS, the maximum available may actually be less than on shared hosting.
Getting started
Before you can load websites onto a VPS you will need the following:
- An account with a web hosting service that gives you administrative access to a VPS with sufficient resources to run your web sites. This typically involves paying a monthly fee – it’s best to avoid long-term contracts until you’ve confirmed that the server satisfies your needs. Some guidelines for choosing a good host are below. You will be given at least one unique IP address for the server and an administrator username and password that allow you to install an operating system and reboot the server. Such accounts can usually be created in minutes but may take longer if payment has to be verified.
- Administrative access to a domain name for each web site. This typically involves paying a small yearly fee to a domain registrar. They will give you a username and password that allow you to change the Domain Name System (DNS) settings for your domain. It can take 24 hours or more for these new settings to completely propagate around the global domain name system. In the meantime you can access your VPS directly by IP address. Be careful about buying your domain name from the same company that hosts your sites, because that makes it much harder to move to a new host if there’s an account dispute or the hosting company goes bust.
- A suitable operating system installed on the server – some guidelines for choosing one are below. Usually the hosting service will install a standard operating system for you – if not, you may have to load the OS from an “iso” file. You would normally load the “server” (not “desktop”) edition of an operating system in this situation.
- If the server is remote (no screen or keyboard access) you will need to install client programs such as PuTTY and WinSCP on Windows or Filezilla on a Mac to send commands and files to your VPS over a secure shell (SSH) connection. You can usually also enter commands from a console window at the hosting company website, which is useful if you lock yourself out of the SSH connection. Console access is sometimes not possible from a phone.
Choosing a hosting company
When choosing a hosting company look for reliability, good network connectivity and good support as well as cost. You’re unlikely to get these from a PC under your desk. Redundant network connectivity and power supplies are very desirable, also good physical security and some sort of backup system. It’s hard to find objective reviews but www.webhostingtalk.com is a good place to start.
Here are some suggested things to check when moving to a new VPS hosting company:
- How much RAM and disk space is offered? Life will be easier if you have at least 2 GB of RAM and 20 GB of disk space, or preferably double that.
- Are there any restrictions on the amount of data traffic allowed per month? If so, try to find out how much your sites typically used in the past.
- What hypervisor do they use to run VPS instances? “Native” or “bare metal” hypervisors such as Xen or KVM are preferable to “hosted” hypervisors like OpenVZ or Virtuozzo because they allow access to kernel-level commands like “ipset” that may be needed to block denial of service or spam attacks. They also have better isolation from other users.
- Do they allow email hosting? Many cloud hosts completely block mail ports to prevent spam abuse. You may or may not be able to convince them to unblock the ports by raising a support ticket. If not, you’ll have to use a third party for sending mail (I use Amazon SES) or even for receiving.
- Do they offer IPv6 connectivity? It’s not essential yet but is likely to be soon and hosting is sometimes cheaper if you don’t need IPv4.
- Do they have a good reputation for fast and helpful support? Try searching for reports of past problems from other users.
- Is there a trial period or monthly billing option? If possible, monitor the reliabililty and responsiveness of a new host for a month or two using free services like uptime robot and loader. If page load times are more than 2 seconds or downtime is more than a few minutes a month you’re unlikely to be happy with the hosting.
- Do they offer automated “snapshot” backups in case you mess up the configuration? How hard is it to restore a full or partial backup?
- Are all backups encrypted and stored off-site? It’s good practice to encrypt data “at rest” and could save you having to contact all your customers if backups are compromised or there’s a disaster or the host goes out of business (it has happened to me twice), but many hosts don’t offer this.
- Can you install the operating system from your own “iso” image or from a virtual machine image? You will need this to make and restore your own whole-server backups, or to enable whole-disk LUKS encryption during installation. Many hosts don’t allow it.
- Is the recovery console accessible from a mobile phone? Believe it or not, many hosts can’t do this – the device must have a physical keyboard.
- Is it possible to add admin users to your account? If not and you want to allow someone else access, you’ll have to share a password and disable 2FA. Ugh!
- Does the data centre have good environmental credentials? Hosting uses a lot of electricity.
Location typically doesn’t matter much – sites will load a little faster if the server is in a country close to your main users and payment and support may be a little easier if the server is in a timezone close to you (the administrator), but other factors such as price and reliability are often more important than location. Local legislation about privacy, libel, censorship, copyright and taxation may also be relevant. I have used hosts in the UK, Europe, the US, India, Singapore and Australia without problems.
Choosing an operating system and control panel
I prefer so-called LOMP hosting (Linux, OpenLiteSpeed, MariaDB, PHP) because it’s open-source (cheap, patchable, secure) and compatible with popular content management systems. Any of these Webmin supported systems are reasonably complete and secure. Windows hosting is typically more expensive and not described here (or supported by Virtualmin) but may be necessary for sites that are scripted using Microsoft ASP.
You might not need any control panel at all if your server has only one user and that user is comfortable with using the command line. For most people though, I recommend open-source Virtualmin for configuring and managing the server, rather than a licensed control panel such as cPanel or Plesk because it’s full-featured, it’s the cheapest way to set up multiple sites and you retain full control of the server – you can still edit config files by hand, whereas other control panels override them. The rest of this tutorial assumes you are using Virtualmin.
Update April 2025: Virtualmin is falling behind and I am currently migrating to a new control panel, probably DirectAdmin. This tutorial will be replaced soon.
For managing the content of individual sites, I recommend using a well-supported Content Management System (CMS) such as WordPress. Even very basic sites need to be updated regularly and a content management system makes this much easier, as well as giving you better Search Engine Optimisation (SEO), access to themes and plugins that add useful functions such as search forms, contact forms with spam protection, image galleries, event calendars, online shops and so on. If you need more advanced features than the built-in “Gutenberg” WordPress block editor, I recommend spectra because it’s fast and easy to use.
Proprietary systems or “website builders” generally have more limited features and can be very difficult to move to a new host or add new features. They’re great for beginners but not so useful in the long term.
Installation
If you are installing the operating system from scratch, you may be asked to select some configuration options. If in doubt, accept the default values. For example, when installing Ubuntu 24.04 LTS you may be asked to choose options listed below.
Note: To access the Encrypt the LVM group with LUKS option you may need to install the operating system manually from an attached “iso” image rather than using a standard installation from the hosting provider. Not all VPS hosts allow this. Some will encrypt backups some other way, which makes it less necessary.
- Keyboard layout, language and country – choose the best ones for you, the administrator. Other users and websites can have their own settings.
- Network connection – keep the automatically assigned (DHCP) one if you can, to simplify backups and transfers. You may wish to enable IPv6 under Network Configuration > ens3 > Edit IPv6 > Automatic (DHCP). If you’re creating a new virtual machine you will probably need to select “Bridged” mode (rather than NAT) first in the network settings for the virtual machine.
- Hostname – choose a “fully qualified” name if you can, such as a subdomain of a domain you own, like server.mydomain.com (you can change this later).
- HTTP proxy – none.
- Real name, Username and Password – choose values appropriate for you personally. Usernames are conventionally lowercase because that’s faster to type. Other administrators can be added later. Your password should be long, random and unique (and stored in a password manager). The administrator password should NOT contain “special” characters (punctuation) because they may not be accepted by the recovery console. Do NOT use “root” as your username or give the root user a password because that’s a significant reliability and security risk (Ubuntu won’t allow it by default). See below for how to fix this after installation. Once logged in as a member of the “sudo” group you can easily use the command “sudo -i” to change to root when necessary.
- Guided storage configuration. Beware! By default the installer will partition (and wipe) the whole disk, and the default volume configuration will leave half the space unused, which I consider a waste of expensive space. I suggest selecting Encrypt the LVM group with LUKS to give you encrypted backups which is best practice for security, but it does mean you will need to manually enter a password every time you reboot the VPS. On the summary page, find the new unbuntu-lv volume and increase its size to the maximum (just enter 9999).
- Encryption passphrase – again, avoid punctuation or accents since some consoles don’t support them. It should be long and unique (but no longer than 20 characters, again because some consoles don’t support them). Note: Some consoles don’t support entering this password from a phone or tablet – you will need to use a laptop or PC with a real keyboard.
- Profile configuration – The server name doesn’t allow spaces or periods here but it helps if it’s a unique name for now, like “servermydomain”
- Ubuntu Pro – skip for now unless you already have an account, we will enable it later
- SSH configuration – select Install OpenSSH server
- Featured server snaps – none, it’s better to allow the Virtualmin installation script to install the rest.
On the “Installation complete!” page wait for the link at the bottom to change from Cancel update and reboot to Reboot Now. If you have installed from an ISO file, you need to disconnect it before rebooting.
Check the console and enter the encryption passphrase you chose above if you see a request similar to Please unlock disk dm_crypt-0:.
Initial security patches
For security reasons, the first thing you should do after starting the server for the first time is login at the console using the administrator username and password (as configured above or given to you by the hosting company) and install the latest operating system patches. On Ubuntu and other Debian-based systems you can do this with the following commands. Not all consoles allow cutting and pasting of commands, so you might have to type these manually.
sudo apt update
sudo apt full-upgrade
The “sudo” part is necessary when you are logged in as a normal user rather than superuser “root”. It effectively allows any user (who is also a member of the “sudo” group) to run commands as root. It will prompt you for your password the first time you use it in a session.
Why not just log in as root in the first place? Because there’s a significantly greater risk of the root account being compromised, and because it’s easy to accidentally do harm if you’re constantly logged in with superuser privileges. See below for how to fix this if an unwanted root password has already been set up.
Checking timezone and locale
Check that your server has an appropriate timezone set. It is usually most convenient to set it to the zone in which the main administrator is located, since it avoids the need to translate timestamps in log files. You can check the current timezone and list possible settings with these commands:
timedatectl
timedatectl list-timezones
Then change the setting with a command like this:
sudo timedatectl set-timezone Europe/London
Check that your server has an appropriate locale set (used for date formats and password checks):
locale
You should see a list of settings such as LANG=en_GB.UTF-8. If it’s not set correctly, you can find and install an appropriate language pack and set the locale with the following commands (using British English as an example):
sudo apt search language-pack
sudo apt install language-pack-en
sudo update-locale LANG=en_GB.UTF-8 LC_MESSAGES=en_GB.UTF-8
You will need to reboot for this change to take effect.
sudo reboot
If you see unwanted console messages or other interference from “cloud-init” during the boot process you can disable it with the following command.
sudo touch /etc/cloud/cloud-init.disabled
If your operating system has been installed from a standard hosting company image, the root SSH keys may be the same as every other VPS they host, which is a significant security risk. If in doubt, you can regenerate the keys at any time with the following commands (which won’t interrupt an existing SSH session):
sudo /bin/rm -v /etc/ssh/ssh_host_*
sudo dpkg-reconfigure openssh-server
If you want to be able to transfer sites to other servers or set up automated backups via SSH, you will need a public/private key pair on the VPS itself. You can easily generate them with the following command (leave the password blank).
sudo ssh-keygen -t ed25519
The public key will typically be saved in /root/.ssh/id_ed25519.pub from where it can be copied to the authorized_keys file on the remote server. Remember to remove it again if it’s no longer needed, because forgotten keys are a common route for malware to spread between servers.
Installing the Virtualmin control panel
To download and install Virtualmin, follow their latest instructions or simply run the two commands below. You might be asked to change the hostname to a “fully qualified” name – that means a subdomain of a domain you own, for example server.mydomain.com.
wget https://software.virtualmin.com/gpl/scripts/install.sh
sudo /bin/sh install.sh
See “Replacing Apache2 with nginx” below if you want to install nginx instead of Apache. This has to be done on a “clean” server.
If you want to install OpenLiteSpeed instead of Apache, first install Apache as above then replace it later as described below (because Webmin doesn’t support OLS alone). It’s also possible to replace MariaDB with MySQL or PostgreSQL later.
To connect to the Virtualmin web interface and complete the installation, point your browser to port 10000 on the server, for example https://server.mydomain.com:10000. The address to use is shown when the installation script completes.
If you have not already setup DNS records to point to the server hostname you can use the IP address instead of the hostname for now. For example, if the IP address of your server was 192.0.2.0, the address to visit would be http://192.0.2.0:10000. In this case you may get a browser warning about an untrusted (self-signed) certificate, which is safe to ignore for now. Login with username and password you used above, or the administration username and password given to you by your hosting company.
You will be taken through a post-installation wizard. The default answers are usually fine but I would advise selecting No for Enable virus scanning with ClamAV, Leave Unix socket authentication for the MariaDB root user, select Skip check for resolvability beside “Primary Nameserver”, and select the “RECOMMENDED” size for the MariaDB database. If you plan to use OpenLiteSpeed, set Location for SSL certificates to In each domain’s home directory. Click Re-check and refresh configuration when prompted.
From now on things are much easier because Webmin gives you a file manager and a terminal window that accepts cut and paste commands and so on.
If you have the ability to take a “snapshot” backup of your entire server now is a good time to make one, because this is a good place to return to if you mess things up.
Configuring Virtualmin
Visit Virtualmin > System Settings > Features and Plugins to deselect any features you won’t use. Personally I deselect the following modules to save memory usage:
- BIND DNS domain – if you only have one VPS it’s better to use a pair of free nameservers from Cloudflare. You may have to first uncheck DNS domain enabled for the default server that is created for the hostname, which is normally hidden but can be found at Virtualmin > System Settings > Account Plans > Default Plan > Virtual servers on plan.
- Awstats reporting – uses a lot of resources and counts bots as visitors. I use Matomo or Google analytics.
- PostgreSQL database – I only use MariaDB (or MySQL) because most scripts require that.
- ProFTPd virtual FTP – I use secure file transfers (SCP or SFTP) via SSH instead, for security, speed and reliability.
- Virus filtering – ClamAV is ineffective and hogs memory.
- Spam filtering – the default spam filtering set up by Virtualmin happens too late and can result in unchecked spam being forwarded, damaging your reputation. I recommend setting up Amavis as described below. Note also the comment below about enabling mail filters for other reasons.
Before adding any sites, you might want to tweak some of the Virtualmin settings. Here are some of the settings I find it useful to change.
In Virtualmin > System Settings > Virtualmin Configuration I make these changes:
- Under category User interface settings I adjust Columns to show to incude quotas and PHP version, Show mailbox size in users list, Show last login in users list, and turn off Show Pro features overview.
- Under category Defaults for new domains I increase Length of randomly generated password to 20 and and the Characters for random passwords to the following set (avoiding “lookalike” characters or any that are difficult to type on some keyboards). If you do this, the password generator will pass its own strength check!
ABCDEFGHJKLMNPQRSTUVWXYZabcdefghijkmnopqrstuvwxyz23456789
- Under Spam filtering options I set the Default delivery for spam to Deliver normally because I find wanted messages too often get lost in Spam folders and Bayesian training doesn’t work very well any more.
In Virtualmin > System Settings > Server templates > Default Settings and in Settings for Sub-Server I make the following changes:
- Under category Administrator user I set Disk quotas type to Soft (advisory only) because hard quotas can cause silent loss of emails
- Under Mail for domain I increase the default mailbox size to at least 1 GB
- Under Website for domain I turn off Redirect webmail.${DOM} and Redirect admin.${DOM}. I turn on Redirect all HTTP requests to HTTPS.
- Under category Spam filtering I select Automatically delete old spam and Automatically delete old trash after 30 days.
- Under category PHP options I add the following to Additional PHP-FPM pool options because the default settings in Virtualmin can result in excessive memory usage if your server hosts many sites. Note that the PHP documentation and Virtualmin documentation both incorrectly state that pm.max_children has no effect in the “ondemand” mode – it does work.
pm = ondemand
pm.process_idle_timeout = 10s
pm.max_requests = 200
pm.max_children = 12
The default PHP resource settings are often far too small to be useful, I increase them at Webmin > Tools > PHP Configuration > [select version/fpm/php.ini] > Manage > Resource Limits.
- Maximum memory allocation 1500M
- Maximum HTTP POST size 100M
- Maximum file upload size 100M
- Maximum execution time 60s
The equivalent defaults settings for OpenLiteSpeed can be found in /usr/local/lsws/lsphp83/etc/php/8.3/litespeed/php.ini (for example).
Connecting to the secure shell
Assuming you now have a remote server running a freshly-installed Linux operating system and Virtualmin but nothing else and you are configuring it from a local Windows PC, it’s convenient to be able to manage it by connecting to the secure shell (SSH) using PuTTY for the command line and WinSCP for file transfers. This is often faster than the hosting company console we were using above or the Webmin file manager – for example, it allows commands to be cut and pasted. Install and run PuTTY on your Windows PC and put the IP address of your VPS (which the hosting company will tell you) where it says “Host Name (or IP address)”, leave the Port set to 22 and select Connection type: SSH.
Enter the administrator username and password you chose above (or given to you by your host) then click the Open button. Some hosts allow you to use a previously generated authentication key (see below) in which case the password is not needed.
The first time you connect to your new server you will see a warning that the server’s host key is not cached. Click “Yes” to save the key and connect. Enter your admin username and password when prompted.
Using authentication keys for SSH
Authentication keys are significantly more secure than passwords, and by default on Ubuntu this is the only way to log in as the root user and the only way to perform unattended backups, so it’s worth learning to use them.
First, generate a public/private key pair for yourself using a program such as PuTTYgen on Windows. The default RSA key type is no longer considered secure – I suggest choosing key type EdDSA using curve Ed25519 (255 bits). It’s good practice to protect private keys with a passphrase. I store that passphrase in KeePassXC and use Pageant from PuTTY to unlock the key automatically as required.
Next, copy the public key from the top window in PuTTYgen to your VPS – paste it into a file called authorized_keys inside a folder called .ssh in your user’s home folder. This file must be visible only to you, the admin user. You can use Webmin > Tools > File Manager or console commands such as those below to create the folder and file with necessary permissions.
cd ~
mkdir .ssh
chmod 0700 .ssh
cd .ssh
sudo nano authorized_keys
[right-click to paste your public key on one line and save using Ctrl+O then Ctrl+X]
chmod 0600 authorized_keys
Don’t disclose the private key to anyone! To use PuTTY to connect to your server, make sure Pageant is running and your encrypted key has been added to it, then click Open. If it’s working you should NOT be prompted for a password when you try to connect, though you will get a warning about being an unrecognised host the first time, which you can safely ignore.
To use WinSCP to connect to your server and manage files graphically, click New Session, select File Protocol: SCP, put the IP address of your server in Host name, enter your User name, leave the password field blank and again make sure Pageant is running.
If you have a lot of files to manage for different users, it’s sometimes more convenient to connect as user “root”, by adding a key to file /root/.ssh/authorized_keys. If you do this, be very careful not to damage essential system files, and also make sure that any files you change are left owned by the correct user and group rather than by root. This is easy to forget and can cause all sorts of weird symptoms.
Once you are sure you can login successfully without a password, you can go to Webmin > Servers > SSH server > Authentication and set “Allow authentication by password?” to “No”.
Note that some administrators change the port the SSH server listens on from 22 to something higher, to reduce hacking attempts and associated log file entries. I do NOT recommend this because it’s only a temporary solution that doesn’t ultimately improve security at all, and can actually make it worse – whichever port you use will be found eventually by port scanners. I do however recommend setting up fail2ban to reduce server load.
Note that if you don’t like the advertising in the “message of the day” you can remove it by going to /etc/default/motd-news and setting ENABLED=0 then go to /etc/update-motd.d/10-help-text and comment out the printf lines at the bottom.
I change the terminal prompt to show the full hostname rather than just the first part by searching file /root/.bashrc for all instances of \h and replacing them with \H.
Setting up Dropbear
If you have set up LUKS disk encryption as recommended above, you will need to enter the encryption passphrase to unlock the disk every time the server is rebooted. You can do this in the console window at the VPS hosting provider, but there is an easier way (which works from mobile phones, unlike some console windows). You can install a minimal SSH server called Dropbear in the (unencrypted) boot partition, configured to accept your normal SSH credentials.
On Ubuntu, dropbear can be installed with this simple command
sudo apt install dropbear-initramfs
Add the following configuration to file /etc/dropbear/initramfs/dropbear.conf (explained here).
DROPBEAR_OPTIONS="-I 180 -j -k -p 22 -s -c cryptroot-unlock"
Add a file authorized_keys containing the public key to be used for authentication. You can simply copy this from the root user if you want to use the same keys. Then make (or update) initramfs – a filing system that can used during the boot process.
sudo cp /root/.ssh/authorized_keys /etc/dropbear/initramfs/authorized_keys
sudo update-initramfs -u
That’s it! To test it, reboot the server, then use an SSH client such as PuTTY to connect to the IP address of the server. (Note that connecting to the hostname or using WinSCP won’t work.) You should see a prompt to enter the LUKS encryption passphrase.
Removing root passwords
If you are logged in to Webmin as the administration user (created during the installation process above), you may have noticed that your webmin username is shown correctly at the bottom of the left menu bar, but if you go to Webmin > Webmin Users, the only username listed is root. Confusingly, that’s actually you but it’s not the same as being the unix root user – Webmin is allowing you root-level access to the file system because that’s necessary for server administration. I advise changing the username to your real usernamce to avoid confusion. Since the only way to log in to Webmin is with a password, it is still effectively allowing password access to root by the back door, and is therefore quite dangerous. I advise setting a very strong password and enabling 2FA on this webmin account.
If your host has messed up and created a password for the unix root account, here’s how to fix that to make your server more secure.
If it doesn’t already exist, create a new unix username for yourself at System > Users and Groups > Create a new user (don’t delete the old root user!). Most people just use their first name in lowercase, perhaps appended with the first letter of their last name if it’s a common name. Set Shell to /bin/bash, add a long unique password and under Secondary groups select sudo and click the right arrow so it appears under In groups. Click the green Create button. You should now be able to login as this user in the recovery console or in an SSH terminal and become root again by entering the following command. Check that this works!
sudo -i
Finally, disable the root password by going to Webmin > System > Users and Groups > root > Password and selecting No login allowed. I also advise disabling Allow authentication by password in Webmin > Servers > SSH Server > Authentication.
Additional packages
You will sometimes need to install extra packages that are required by the specific programs you install. Some examples that I have found useful (install from the command line or from Webmin > Software Packages > Package from APT):
There are some packages that are currently sometimes needed by Virtualmin but not installed by install.sh:
sudo apt install net-tools libauthen-libwrap-perl
Generally also useful:
sudo apt install logwatch automysqlbackup rkhunter jq memcached ncdu redis
See “Database backups” below for optional reconfiguration of automysqlbackup.
Also the “wp” command line utility (useful for running cron jobs and for maintenance of WordPress sites) can be installed, updated and tested using these commands:
curl -O https://raw.githubusercontent.com/wp-cli/builds/gh-pages/phar/wp-cli.phar
chmod +x wp-cli.phar
sudo mv wp-cli.phar /usr/local/bin/wp
wp --info
Additional PHP versions
PHP versions have a support life of only two years, whereas Ubuntu “Long Term Support” releases are supported for ten years. This isn’t necessarily a problem because Canonical backports PHP security patches from later PHP versions to keep the older version working for the lifetime of the Ubuntu LTS release. Nevertheless it’s good to keep up with the latest PHP versions because they are often faster and contain new features that modern websites may require.
Virtualmin supports running multiple PHP versions, but make sure you have a snapshot backup of the entire server before trying this, because Virtualmin has been buggy in this area in the past and a mistake could bring down all your sites. Most VPS hosts provide an easy way to make and restore snapshots, although there is often a small cost involved for the storage. Note that this section only applies to Apache2 and PHP on the command line – OpenLiteSpeed and nginx have their own PHP packages.
You will have to either compile the later PHP versions from source (not difficult but not really necessary either), or enable an “external” repository (not managed by Ubuntu) by executing these commands:
sudo apt-get install software-properties-common
sudo add-apt-repository ppa:ondrej/php
sudo add-apt-repository ppa:ondrej/apache2
sudo apt update
sudo apt full-upgrade
You can then install packages for specific versions, for example:
sudo apt install php8.3-{common,fpm,cgi,cli}To set a specific version as the default on the command line and check it:
sudo update-alternatives --set php /usr/bin/php8.3
sudo php -v
Check that your sites are still working. Then go to Virtualmin > System Settings > Re-Check Configuration to make Virtualmin recognise the new available PHP versions. You can now select the version used by each site at Virtualmin > Server Configuration > PHP Versions.
It’s possible to select different PHP “execution modes” for each site at Virtualmin > Server Configuration > Website Options – I recommend FPM because it’s significantly faster and uses less memory. This is now the default.
Additional PHP packages
Generally useful:
sudo apt install php-memcached php-apcu php-redis
sudo apt install php8.3-{gd,zip,mbstring,intl,xml,mysql,uploadprogress,gmp,memcached,redis,apcu}
Needed particularly by WordPress (including for WooCommerce):
sudo apt install php8.3-{curl,soap,bcmath,imagick,ssh2}Apache configuration
Although I now recommend OpenLiteSpeed instead of Apache, Apache is installed by default by Webmin and it’s still a good idea to keep it installed as a backup in case of problems.
Apache modules can be enabled and disabled in Webmin > Servers > Apache Webserver > Configure Apache Modules. I suggest enabling at least the following modules, which are often used in “.htaccess” files (but see below about possibly using LiteSpeed instead).
- headers
- expires
It’s also a good idea (for performance) to enable http2, which requires enabling module mpm_event (instead of mpm_prefork), cgid (instead of cgi, only required if cgi scripts are used otherwise leave disabled for better security), include (only if server-side include scripts are used) and disabling any Apache php modules (such as php8.3). If any of your sites ever use a proxy such as Cloudflare, it’s a good idea to enable module remoteip so that the correct IP address is shown in log files. Therefore, I recommend also enabling these Apache modules, but only if needed:
- cgid
- include
- remoteip
You may not be able to change the “mpm_event” setting until you have removed any php* modules. Don’t forget to click “Apply Changes” at the top right after changes.
There is a Virtualmin bug that can cause Apache or PHP-FPM to fail to restart when Apache php modules are disabled like this. Old sites that used these modules may have inserted statements beginning “php_” into their configuration files, which must be removed. You can find them by using “grep” to search in /etc/apache2/sites-available/ and /etc/php/.
MariaDB configuration
Some applications (e.g. CiviCRM) will complain that the database lacks “Time Zone Tables”. The following command will load them, assuming the root MariaDB user is authenticated using a socket as recommended. Otherwise, you will first need to create a MariaDB administrator username and password for yourself at Webmin > Servers > MariaDB Database Server > User Permissions > Create a new user and add -u and -p options below to specify your username and password. Restrict the Hosts for your MariaDB user to localhost and select all the permissions.
mysql_tzinfo_to_sql /usr/share/zoneinfo | mysql mysql
Webmin restricts database usernames to a maximum 16 characters for historical reasons. This limit is no longer necessary and can be relaxed by adding the following parameter to /etc/webmin/virtual-server/config and restarting MariaDB.
mysql_user_size=80
You can use the mariadb-check or mysqlcheck command to check, repair, analyze and optimize databases, for example:
mariadb-check --all-databases
If you have trouble importing and exporting SQL data you can use the Operations tab in phpMyAdmin to change the storage engine of each table to InnoDB and the collation of all tables and columns to utf8mb4_unicode_ci to bring them up to date. You may also need to search for invalid default dates which are sometimes set to 0000-00-00 and should be replaced with a real default such as 2000-01-01 or set to NULL.
Networking
Check IP addresses
By default IP addresses will be allocated automatically using DHCP. You can check your IP addresses (IPv4 and IPv6) at Webmin > Networking > Network Configuration > Network Interfaces. This has the big advantage that you can still access the server if for example a backup image is restored to a new server or there’s a network problem. However, a changed hosting IP address will cause all hosted sites to appear offline until their DNS records are changed so sometimes it’s better to set static IP addresses to prevent that if DHCP fails. It’s normal to be allocated a /64 group of IPv6 addresses but only one IPv4 address.
Note: The Webmin install.sh script omits the package net-tools which is needed to correctly display the network configuration (see “Additional packages” above).
Check hostname and DNS
Check your hostname under Webmin > Networking > Network Configuration > Hostname and DNS Client – Webmin might shorten this, you want the complete “fully qualified” name (something like server.mydomain.com). Some hosting companies overwrite this information every time a VPS is rebooted – you may need to contact them to get it changed. Do NOT accept a generic name provided by the hosting company if you will be sending email from the server because spam filters will block it and you can’t easily generate SSL certificates for it.
In the same screen, if you have followed my advice above and disabled the BIND DNS domain Virtualmin feature, you may want to change the DNS servers for better resiliency. The best ones to use are often the ones the hosting company supplies – check their documentation. The Cloudflare 1.1.1.1 public DNS service is a reasonable choice for the third option. You should preferably have a least two addresses in the list (but more than three may be ignored). IPv6 addresses can be used.
Your hosting provider should allow you to set the “Reverse DNS” settings (or “PTR” record) for each IP address they have assigned you. Spam filters often check that this is set correctly, so it’s worth configuring.
Additional security
The default settings that we have installed so far provide a reasonable level of security, as long as you choose hard-to-guess unique passwords and install security patches quickly (preferably automatically). Nevertheless, your VPS will be attacked constantly by hackers and spammers so you should remove as many vulnerabilities as possible (this is called “hardening”) and check your log files regularly. I’ve experienced unpatched servers being compromised and used (expensively) to send spam within minutes of going live.
Install SSL certificates
Virtualmin now automatically installs free SSL certificates from LetsEncrypt for your VPS and all the websites it hosts. This only works if you have already created DNS records (A and AAAA) that point to your VPS, otherwise a temporary “self signed” certificate will be installed instead, and visitors will see security warnings in their browser.
So, after changing DNS settings remember to go to Webmin > Webmin Configuration > SSL Encryption > Let’s Encrypt and click Request Certificate.
Automatic kernel updates
You can register for an Ubuntu Pro account at https://ubuntu.com/pro and get a free personal token good for five machines. Let’s call it [myprokey]. Then you can attach the server using a command like this.
sudo pro attach [myprokey]
This will allow most updates to be installed without needing to reboot the server.
Restrict Webmin logins
The Webmin interface is another way a hacker could get root access to your server. I strongly advise enabling two-factor authentication for any superuser or a user who is a member of the “sudo” group. You can enable this at Webmin > Webmin Configuration > Two-Factor Authentication. If, like me, you prefer to use KeePassXC or 2FAS to do the authentication (so you can recover your accounts if you lose your phone), you rather confusingly need to select Google Authenticator here, otherwise you have to mess around with API keys instead of using QR codes. Set it up for yourself by clicking your username at the bottom of the Webmin sidebar then Security and limits options.
You can enforce strong passwords in Webmin > Webmin users > Password restrictions – NIST guidelines now recommend a minimum length of 15 characters but with no restriction on character types.
If you click your username at the bottom left of the Webmin menu, a settings window will open. If you have followed the tutorial this far, it probably shows your username as “root”, which is confusing (and dangerous, because it encourages password sharing). I prefer to change it to match my Webmin username.
You can restrict access to certain Webmin modules depending on the user, which de-clutters the Webmin menus and improves security. I suggest creating a group with a name like “Administrators” in Webmin > Webmin Users and enabling all modules except those in the “Hardware” and “Cluster” groups. Add yourself to that group in the same screen. Then in Administrators > Available Webmin modules deactivate everything that appears in Un-used Modules in the menu bar at the left. I move the “System Time” module to the “System” menu by going to Webmin > Webmin Configuration > Reassign Modules.
While you’re there, visit the “Time server sync” tab in System Time and configure a time server name (I use uk.pool.ntp.org) and enable Synchronize on schedule. This is important, because if the server time drifts too far, two-factor authentication may fail. You may need to install the systemd-timesyncd package.
Disable unnecessary services
The proftpd and clamav services are usually not needed and can be uninstalled to save resources by going to Webmin > System > Software Packages or using the following commands:
sudo apt remove proftpd-core clamav*
sudo apt autoremove
Mitigate cookie hijacks
To mitigate cookie hijacks add these settings at the bottom of the FPM php.ini configuration files (e.g. /etc/php/8.3/fpm/php.ini and /usr/local/lsws/lsphp83/etc/php/8.3/litespeed/php.ini) at Webmin > Tools > PHP Configuration
session.cookie_samesite = "Lax"
session.cookie_httponly = 1
session.cookie_secure = 1
Don’t forget to restart PHP after making any configuration changes. You can easily do this in the Service Status section of the Webmin dashboard for Apache, or using this command for OpenLiteSpeed.
sudo killall -9 lsphpRestrict obsolete cipher suites
In Webmin > Servers > Apache Webserver > Global Configuration > Configure Apache Modules make sure the “headers” and “expires” modules are enabled (see above). They are required below, and are also often used in “.htaccess” files to provide “friendly” URLs and to control page cache timeouts. If you see the server’s default Apache page instead of your website these missing modules might be the cause.
To restrict the use of obsolete and insecure SSL ciphers for PCI DSS, HIPAA and NIST compliance, enable OCSP stapling and HTTP Strict Transport Security, and enable Cross-Site Scripting protection in browsers you can add these statements to the end of file /etc/apache2/apahe2.conf in the root of the server, also accessible from Webmin > Servers > Apache Webserer > Global Configuration > Edit Config Files. They can be checked with the ImmuniWeb and Qualys SSL Labs server tests and should be enough to get you an A+ rating. Don’t forget to click “Apply changes” afterwards (the refresh symbol at the top right of the Apache Webserver page).
# From https://ssl-config.mozilla.org/#server=apache&version=2.4.41&config=intermediate&openssl=1.1.1k&guideline=5.7
SSLProtocol all -SSLv3 -TLSv1 -TLSv1.1
SSLCipherSuite  ECDHE-ECDSA-AES128-GCM-SHA256:ECDHE-RSA-AES128-GCM-SHA256:ECDHE-ECDSA-AES256-GCM-SHA384:ECDHE-RSA-AES256-GCM-SHA384:ECDHE-ECDSA-CHACHA20-POLY1305:ECDHE-RSA-CHACHA20-POLY1305:DHE-RSA-AES128-GCM-SHA256:DHE-RSA-AES256-GCM-SHA384:DHE-RSA-CHACHA20-POLY1305
SSLSessionTickets off

SSLUseStapling On
SSLStaplingCache "shmcb:logs/ssl_stapling(32768)"

# Additional after testing at https://www.immuniweb.com/websec/
SSLHonorCipherOrder on
SSLSessionTickets off
Protocols h2 http/1.1
Header set Strict-Transport-Security "max-age=63072000"
Header set X-Content-Type-Options nosniff
Header set Referrer-Policy no-referrer-when-downgrade
Header set X-Permitted-Cross-Domain-Policies "none"
Header set Content-Security-Policy-Report-Only "default-src 'self';"
You will probably need to tweak the Content-Security-Policy to your requirements. I recommend initially setting it to Content-Security-Policy-Report-Only and checking for errors in the “Inspect” utility by pressing F12 then Console in most browsers. When you have fixed all the Content-Security-Policy warnings (by removing unneeded external content or by adding exceptions to the policy) you can remove the “-Report-Only” from the name. Ideally, you would do all this site-by-site, but that’s a lot of work for a relatively small benefit (the policy is only advisory and can be ignored anyway) so I tend to do it for the whole server.
Similarly, at Webmin > Webmin Configuration > SSL Encryption check that all SSL protocols below TLSv1.2 are rejected and Only strong PCI-compliant ciphers and Enforce SSL with HSTS header are selected and similarly at Usermin Configuration > SSL Encryption.
Be careful about restricting email connections too much in Postfix (/etc/postfix/main.cf) or Dovecot (/etc/dovecot/dovecot.conf) because there are many old email systems out there that can’t cope with newer ciphers and you could lose messages. You should nevertheless make sure that email login passwords won’t be accepted if visible in plain text. For outgoing mail go to Webmin > Servers > Postfix Mail Server > SMTP Authentication and Encryption and check Require SASL SMTP authentication? and Disallow SASL authentication over insecure connections?. On the same page, uncheck Allow connections from same network (twice) since that’s an unnecessary risk for a VPS in a datacentre. For incoming mail go to Webmin > Servers > Dovecot IMAP/POP3 Server > SSL Configuration and check Disallow plaintext authentication in non-SSL mode.
Notifications of setup problems
By default, email reports of any system problems will be sent to user “root”. You can read them by going to Webmin > System > Users and Groups > root and clicking the Read Email button. It’s usually preferable to send them to an external email address because there’s no point reporting a mail problem to a non-working mail server! You can configure this by going to Webmin > Servers > Postfix Mail Server > Mail Aliases, selecting Create a new alias and setting Address to “root” and your email address in “Alias to”, “Email address”.
Enabling a firewall and fail2ban
A firewall may not be as useful as you expect, because most services on a VPS have to be publicly accessible all the time and unnecessary services should be disabled anyway. Nevertheless, a firewall helps to protect against some types of denial of service (DoS) attack. Firewalld is set up and enabled by default by Webmin and needs no further configuration – it works for IPv6 as well as IPv4.
Fail2ban is essential, really, for controlling server load. It works with firewalld to automatically block the IP address of persistent offenders. It can no longer do much to protect against “brute force” password attacks because botnets simply change their IP address constantly to bypass it, but it is still important for reducing server load. It can be configured at Webmin > Networking > Fail2ban Intrusion Detector. The default settings tend to do more harm than good though so they need some tweaks.
First, I suggest going to Filter Action Jails and setting the postfix-sasl and dovecot jails to something large (like 1,000 attempts a day), because legitimate users sometimes misconfigure their email clients, and if they trigger a ban for a shared IP address they can end up blocking email for a whole building. Note that there’s a bug in Webmin that prevents you saving the configuration (it doesn’t recognise “pop3”) so you’ll have to edit the jails manually. The default ssh and webmin-auth jails can remain.
Next, I recommend copying wordpress-hard and wordpress-soft filters and jails from the WP Fail2Ban Redux plugin and adding an apache-404 filter and jail as described here.
The apache-404 filter is located at /etc/fail2ban/filter.d/apache-404.conf and the contents are below.
[Definition]

failregex = ^<HOST> - .* "(GET|POST|HEAD).*HTTP.*" 404  .*$
ignoreregex = .*(robots.txt|favicon.ico|jpg|png|FeedBurner)
Finally, fail2ban will be almost completely ineffective unless the expiry times are increased from 10 minutes to something like 20 days (which seems to be roughly the maximum that can be achieved).
In /etc/fail2ban/fail2ban.conf I change this setting:
[DEFAULT]
dbpurgeage = 20d
In /etc/fail2ban/jail.conf I change these settings (they should really be in jail.local but Webmin doesn’t find them there).
[DEFAULT]
bantime  = 20d
findtime  = 20d
maxretry = 9
In /etc/fail2ban/jail.local I add these settings:
[wordpress-hard]
enabled = true
filter = wordpress-hard
logpath = /var/log/auth.log
port = http,https
backend = auto

[wordpress-soft]
enabled = true
filter = wordpress-soft
logpath = /var/log/auth.log
port = http,https
backend = auto

[apache-404]
enabled = true
port = http,https
filter = apache-404
maxretry = 100
logpath = %(apache_access_log)s
findtime = 1d
backend = auto
I then create a new file /etc/fail2ban/paths-overrides.local with this content:
[DEFAULT]
apache_error_log = /var/log/virtualmin/*_error_log
apache_access_log = /var/log/virtualmin/*_access_log
Note that Ubuntu creates a file /etc/fail2ban/jail.d/defaults-debian.conf that causes a duplicate sshd jail to be created. That file can be removed or the entire contents commented out.
I add the following entries to Webmin > System > System logs > Settings (cogwheel) > Other log files to show to make it easier to monitor fail2ban and other logs that aren’t included in journalctl.
/var/log/fail2ban.log Fail2ban
/var/log/mysql/error.log MySQL
/var/log/php8.3-fpm.log PHP-FPM 8.3
/usr/local/lsws/logs/stderr.log OpenLightSpeed stderrors
/usr/local/lsws/logs/error.log OpenLightSpeed errors
/usr/local/lsws/logs/access.log OpenLightSpeed access
/var/log/mail.log Mail
/var/log/auth.log Auth
/var/log/syslog Syslog
/var/log/kern.log Kernel
/var/log/letsencrypt/letsencrypt.log Letsencrypt
/var/log/apache2/error.log Apache
Malware scanning
Virus scanners for Linux unfortunately tend to be very expensive or very ineffective. The free version of ImunifyAV is the best I have found. It can be installed as described here and configured as described here. You will need to create a web host for it, which could be a subdomain or simply a page on a site you already have. You then need to create a configuration file to tell Imunify where that site is, and who the owner and group are. You can do that using commands like these:
sudo mkdir /etc/sysconfig
sudo mkdir /etc/sysconfig/imunify360
sudo nano /etc/sysconfig/imunify360/integration.conf
The file should contain the UI path and the UI path owner, something like this:
[paths]
ui_path = /home/[owner]/domains/[imav.domain]/public_html
ui_path_owner = [owner]:[group]
Note that the public_html folder must be empty, otherwise the installation script below will fail. Save the file and exit using Ctrl+O then Ctrl+X. Next, download and execute the deployment script:
sudo wget https://repo.imunify360.cloudlinux.com/defence360/imav-deploy.sh -O imav-deploy.sh
sudo bash imav-deploy.sh
You will probably need to add the names of one or more administrators (sudo users) to the auth.admin file, one name per line.
sudo nano /etc/sysconfig/imunify360/auth.admin
(You can create or promote additional sudo users at Webmin > System> Users and Groups by setting their Shell to “/bin/bash” and adding group “sudo” from Secondary groups.) Save this file, then point a web browser to the web host you created above to view the Imunify dashboard.
You will probably want to configure a notification email, so that you’re informed when malware is found. ImunifyAV (the free version) doesn’t set anything by default. Detailed instructions are here but the simple version is that you first need to download an example “hook script” and make it executable by the “_imunify” group.
cd /etc/imunify360
curl https://docs.imunify360.com/hook_script.sh -O
chown root:_imunify hook_script.sh
chmod g+x hook_script.sh
Edit this file to enable emails to your desired address.
MAIL_ENABLE=yes              # default no, change to "yes" for enabling
MAIL_TO="[your email address]"  # for multiple email addresses, use commas
In the Imunify dashboard, click the “Settings” cogwheel and select the “Notifications” tab. Under “Custom scan: malware detected” and “User scan: malware detected” select “Enable script execution”, paste the location of the hook script (/etc/imunify360/hook_script.sh in this example) and Save Changes. You can test it by also enabling the notification script for Custom scan: started and doing a trial scan of the /home folder in Malware Scanner > SCAN > Start.
Restart the notification service and install the “jq” package.
systemctl restart imunify-notifier
sudo apt install jq
Click the “Scan all” button and come back a few days later to see the results. This checks all user files including emails.
WordFence does include a scanner that can be manually triggered if a WordPress site exhibits symptoms but automatic scans only happen once a month in the free version.
For scanning system files, rkhunter is easy to install using this apt command (a scheduled cron job will be created automatically).
sudo apt install rkhunter
Disk quotas
Disk quotas are enabled by default at Webmin > System > Disk Quotas. They can be useful for two reasons.
- A user might take up more than their “fair share” of expensive SSD space by creating lots of backups or storing large media archives on their website. Professional photographers often need huge amounts of storage, for example. Many hosts offer very cheap “block” storage that can be attached to a server for this purpose. “Soft” (advisory only) disk quotas are more appropriate for monitoring this so you can move archives to the cheaper (slower) HDD block storage. You can make quotas “soft” at Virtualmin > System Settings > Server Templates > Default Settings > Administrator user. I recommend this, because hard quotas can cause user emails to be silently discarded.
- A site might suddenly start using huge amounts of storage due to being hacked, or simply due to human error or a recursive process creating a huge log file. In this case, setting a generous “hard” quota on each account (e.g. 20GB) prevents a problem on one site from taking down the entire server. You can set the default account quota at Virtualmin > System Settings > Account Plans > Default Plan.
A quota for individual mailboxes can also be set at Virtualmin > System Settings > Server Templates > Default Settings > Mail for domain. I suggest 1 GB is a more reasonable limit than the default 50 MB these days (because people now use IMAP more than POP3). To avoid worrying customers, it might be best to remove individual mailbox limits entirely and just rely on the overall account limit for protection and monitoring.
You can set up automatic email alerts in Webmin > System > Disk Quotas > Settings > Quota email messages. For some reason the email for groups is empty – I just use this.
Disk usage for group ${USER} has reached ${PERCENT}% of the allowed quota.DNS configuration
You will need to configure the Domain Name System (DNS) settings for each new site that is added to your VPS. By default, Webmin sets up a local DNS server (called “bind9” or “named”) and adds the needed settings automatically. Unfortunately, this is not a configuration I recommend because it’s a single point of failure that makes it hard to recover from problems – any issue with your server can cause all your sites to vanish for a significant time. Nameservers need to be set up in redundant pairs, physically remote from each other and the sites they serve. If you want automatic DNS configuration, you should therefore set up a second server elsewhere and synchronise it, which is difficult and expensive and won’t be discussed further here. Note though that the “Pro” version of Virtualmin does include a module that can automatically set up DNS records at Cloudflare.
Running a local DNS server does have other potential advantages, such as caching DNSBL blacklist queries when checking incoming mail, which can speed up mail handling. It can also avoid rate limits or other problems with your service provider’s DNS server. On the other hand, some providers (including Cloudflare) require you to use their DNS servers if you want their DDoS protection or faster worldwide domain name resolutions. Also, any local cache risks serving “stale” results or slowing things down when there’s a cache “miss”. The best solution for you therefore depends on your needs and traffic patterns but for this tutorial I’ll assume you’re using Cloudflare.
In any case, there are often situations where manual DNS configuration is necessary, so some discussion here may be helpful. I’ll assume you’re using an external DNS provider such as Cloudflare for your DNS nameservers.
Click the “Add Site” or “Add a domain” button at the top right of the Cloudflare dashboard. Enter your domain name (without the www) and wait a few seconds for Cloudflare to copy any existing DNS records from the old nameservers, if any. Then select a plan (the free one is usually enough) and follow the instructions at your domain registrar to change your nameservers (“NS” records) to point to Cloudflare. For example, at Namecheap you would go to Domain List > Manage > Advanced DNS > Personal DNS Server and enter the two values copied from Cloudflare > [select domain] > DNS > Cloudflare Nameservers.
For a site at www.mydomain.com hosted at IPv4 address 192.0.2.0 and IPv6 address 2001:db8::1 on a server with hostname server.myserver.com the absolute minimum you would need to set up in Cloudflare > DNS would be an A record for www.mydomain.com pointing to 192.0.2.0. All you need to enter in the Name field is www because the “mydomain.com” bit is added automatically.
It’s quite common for visitors to leave off the “www” these days, so it’s strongly advisable to add a second A record for the “naked” domain as well, which you enter in Cloudflare using the character @ for the Name (it displays as the domain, confusingly).
How do you decide which version you will use as the “canonical” domain for things like search results (with or without the “www”)? My advice is to include the www, because it’s instantly recognisable as a website URL on business cards and in emails and easier to type than “https://”, and also because the “naked” version has some limitations (can’t be redirected with a CNAME, not allowed by Google Workspace). But it doesn’t really matter much.
Note that some people use a CNAME for the “www” instead of a separate A record – I don’t recommend this because it adds a second DNS lookup that can significantly slow page loads. The process of removing unnecessary CNAMEs and replacing them with A records is called “flattening”.
A third A record, conventionally mail is usually added to create a subdomain for handling email, because you can’t assume all mail processing will always happen on the same server as your website. This is especially true when setting up a new server with no “reputation” for being spam-free. Many VPS providers block outgoing mail completely for the first 30 days or even permanently, forcing you to use a third party “relay” host to deliver messages. More about this later.
Most hosts now support IPv6, and I recommend adding the same three AAAA records for your assigned IPv6 address as well if you can.
The last absolutely essential DNS record is an MX record that tells mail transfer agents (MTAs) where to send incoming mail for your domain. That should point to the hostname of a mail server (by name, not by IP address), in this case server.mydomain.net. (Avoid using mydomain.net for this when proxying, see below.) Set the “TTL” (time to live) to Auto and the Priority to 10. Avoid having more than one MX address or none at all unless you really know what you’re doing.
Note that by default, Cloudflare sets Proxy status to “Proxied” (orange clouds). I recommend initially setting the status of all records to “DNS only” (grey clouds) at this stage – enabling a proxy is discussed below.
So, here’s what the basic set of records looks like in Cloudflare:
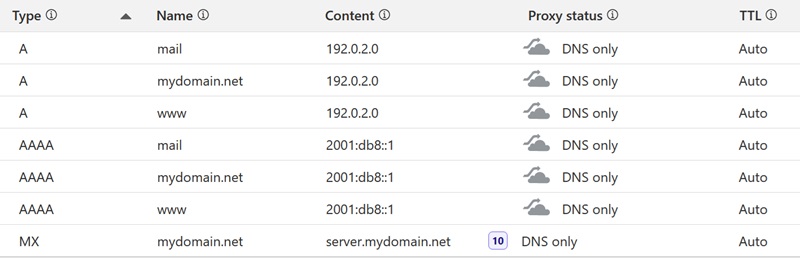
We’re not quite done yet – if you send mail from this domain you will need some more DNS records as described below under “Configuring outgoing email”.
If DNS propagation delays are interfering with your testing you can access a site in “preview” mode at Virtualmin > Services > Preview Website or you can modify the “hosts” files on the server and on your computer. On linux or Mac devices this is located at /etc/hosts, on Windows it’s at C:\Windows\System32\drivers\etc\hosts.
Third party services (like the Google Search Console) sometimes ask you to validate your domain by adding additional CNAME or TXT records – if so, just add them the same way following their instructions.
Once DNS settings have propagated, files in the public_html folder will automatically be displayed to the world. By default, the file for the home page should be named index.html or index.php. A MySQL database is created for each site by default and can be managed at Virtualmin > Edit Databases. You can also install the useful database management tool phpMyAdmin on one of your sites from Virtualmin > Install Scripts.
DNS errors are so common that there’s an industry saying “It’s always DNS!”. Be careful, make backups and consult an expert if in doubt.
Mail-only or website-only DNS settings
If you just use your personal domain for emails and don’t have a website at all, you may nevertheless still need A records and/or AAAA records, because secure email needs SSL certificates, and LetsEncrypt needs a way to validate that you own the corresponding domain. In Virtualmin, it does this by creating a special file in the “.well-known” folder on your server and visiting it with a web browser. It’s not the only way to do it, but it’s the easiest. Virtulamin creates a special holding page in case someone tries to visit the website.
Similarly, if you just use your personal domain for a website and all your emails are handled elsewhere, people may still try to send you emails anyway – not just spam, but in an attempt to notify you about a problem that could cause you to be blacklisted. In theory, every domain is supposed to implement four administrative email addresses for every domain – webmaster@, postmaster@, hostmaster@ and abuse@. They typically all forward to the root account of the server.
This means you really need all the basic DNS records discussed above for every site, regardless of whether it has a functioning website or email addresses or not.
Proxying DNS
There are some additional steps to take and some implications to be aware of before enabling proxying (the orange clouds in Cloudflare).
If you’re using proxying as a kind of CDN (content delivery network) to reduce server load or to speed up content delivery in distant places be aware that all the usual problems with caching need to be considered, particularly potential problems with “stale” versions of content. Note that only Cloudflare’s basic CDN services are free.
Fail2ban may block traffic from Cloudflare unless you enable module remoteip in Webmin > Servers > Apache Webserver > Global Configuration > Configure Apache Modules and create a file /etc/apache2/conf-enabled/remoteip.conf with with a list of trusted proxy addresses as described in this tutorial on DevAnswers. That will enable the display of the correct originating IP address in your access logs. Note that is is no longer necessary to edit the /etc/apache2/apache2.conf file as well.
OpenLiteSpeed has a similar solution, see below. OpenLiteSpeed also has its own alternative content delivery network called QUIC.cloud (not free). I haven’t used it. You should pick just one, mixed services are tricky. to set up.
Beware of redirect loops that might occur if you have any redirections enabled at Virtualmin > Server Configuration > Website Options or in Server Configuration > Website Redirects or in Services > Configure SSL Website.
If you’re using proxying to protect against a DDoS attack, be aware that you need to take steps to hide your origin IP address, otherwise the attackers will simply bypass the proxy and attack you directly.
In this situation it’s better to host email on a separate server than websites, or use an external relay.
Configuring outgoing email
Sending emails directly from a new VPS is no longer as easy as it was. Many VPS providers now completely block outgoing messages (port 25) from a new server for a few weeks or even permanently, to prevent spam abuse. Even where it’s allowed, a new server without an established reputation may be treated as very suspicious by spam filters at the receiving end. An established server may find itself suddenly blacklisted at any time through no fault of its own. In practice it’s therefore necessary to be able to “relay” outgoing messages through a trusted third party, especially in the beginning.
The service I now use for this is Amazon SES because I’ve found it cheap and reliable, so I’ll describe that but there are many alternatives. All of them have a “free tier” for initial testing and hobby use and some sort of fee for larger volumes of mail.
- Go to https://aws.amazon.com and click “Create an Amazon AWS account” at the top right if you don’t already have one. An account at amazon.com is not the same.
- Create a “Root user” account and verify the email address you use for that. Optionally, also create an “IAM user” account.
- Search for the “Amazon Simple Email Service” at the top left. Select a suitable region at the top right.
- Find Configuration > Identities at the left then click the orange Create Identity button at the top right.
- Select Identity Type > Domain and enter your naked domain name (without the www or any subdomain).
- Select Use a custom MAIL FROM domain and enter mail for the subdomain. Uncheck Publish DNS records to Route53 (unless you are hosting on Amazon).
- Click Advanced DNS settings and select Easy DKIM and RSA_2048_BIT. Again, uncheck Publish DNS records to Route53.
- Click the orange Create Identity button again at the bottom right.
You should see a screen containing three CNAME DNS records, and MX record and a TXT record. Cut and paste these records into Cloudflare.
In Virtualmin, email users can be added at Virtualmin > Edit Users > Add a user to this server. Make sure your users have strong passwords to prevent accounts being hacked. A password policy can be set at Webmin > System > Users and Groups > Password restrictions. Note that NIST guidelines now recommend a minimum password length of 15 characters, with no restriction on the types of character.
By default, all mail will be stored on your VPS. Mail forwarding can be set up under Virtualmin > Edit User > Mail forwarding settings, but forwarding from external addresses is unreliable and I no longer recommend it because any forwarded spam can get the whole server blacklisted. Fowarding within the server to consolidate mailboxes is still fine. It’s also possible to set up filters in Usermin (using Procmail) but Procmail forwarding has even worse problems (including discarding messages without warning and looping) and should be avoided.
Alternatively, Gmail users can configure their accounts to use POP3 to retrieve mail that is temporarily stored on your VPS. This is sometimes more reliable than forwarding, but the disadvantage is the polling interval can cause incoming mail to be delayed by up to an hour, which is sometimes very annoying. Using POP3 to retrieve mail to a personal PC is even worse – you can easily lose your entire mail archive (because ‘.pst’ files are hard to back up) and you can’t access it from a phone.
If you do store email on the VPS and you want to access it from a browser (known as “webmail”), you can use Usermin on port 20000 (e.g. https://www.mydomain.com:20000), which also allows access to additional features such as mailbox rules, spam reporting and password changes.
Setting up SPF, DKIM, DMARC and PTR records
Email delivery is no longer reliable unless SPF, DKIM, DMARC and PTR records are properly configured in your DNS settings. To set up Sender Policy Framework (SPF) to help delivery of outgoing email, all you need to do is add an appropriate TXT record to the DNS settings of each of your hosted domains, as shown in the example above. See this FAQ about common mistakes.
Virtualmin now sets up DKIM automatically at Virtualmin > Email Settings > DomainKeys Identified Mail. It also sets up a DNS nameserver with the required DKIM records, but if you have taken my advice to use an external provider such as Cloudflare, you will need to copy the DNS records from that page to your provider.
To set up Domain-based Message Authentication, Reporting, and Conformance (DMARC) you need an address to process the emailed reports (they’re not very human friendly) and a free account from Postmark is an easy way to do that, with a weekly summary and recommendations for fixes. It’s also an easy way to generate the DNS record you need. This will be a TXT record with a name like _dmarc.server1 and containing a string like this:
v=DMARC1; p=reject; pct=100; rua=mailto:[special key]@dmarc.postmarkapp.com; sp=none; aspf=r;
I no longer recommend setting up Sender Rewriting Scheme (SRS) because I no longer recommend forwarding external mail to destinations outside the server and Amazon SES doesn’t allow it anyway.
If everything is set up correctly, you should be able to send a test mail from an address hosted on your server to a Gmail account or Outlook Mail from Webmin > Webmin Configuration > Sending Mail. In Gmail or Thunderbird, you can click the test message when it arrives, then click the message menu (three dots) at the top right then “Show original” and you should see SPF, DKIM and DMARC all showing “PASS”.
The default size limit for emails is 10 MB which is a bit small these days. You can increase it (to say 25 MB, matching Gmail) at Webmin > Servers > Postfix Mail Server > General Resource Control.
Autoconfiguration of email clients
Email clients will try to guess the correct email settings to use based on your email address, but unfortunately the configuration page at Virtualmin > Email Settings > Mail Client Configuration is now largely useless.
The best you can do is ensure that the “mail” subdomain (e.g. “mail.mydomain.com”) for incoming and outgoing mail works, so make sure that resolves correctly in your DNS settings – similar to adding records for “www”. This requires Postfix versions 3.4 and later (Ubuntu 19.10 and later) to work securely with mail connections. In Virtualmin > Services > Configure SSL Website > Edit Directives, check that there is a line similar to this near the top and if not, add it:
ServerAlias mail.mydomain.com
Repeat for Virtualmin > Services > Configure Website > Edit Directives (without the SSL). Click “Save and close” then “Apply changes” at the top right. Now when you return to Virtualmin > Server Configuration > SSL Certificate > Let’s Encrypt you should see the “mail” subdomain included in the list and you can click “Request Certificate” again to add it to the LetsEncrypt certificate.
Note that the correct SMTP port for mails apps to use to send encrypted outgoing mail connections is port 587, but some mail clients still try to connect port 465, even though it has been deprecated for decades. The configuration that enables that is in file /etc/postfix/master.cf and appears as “-o smtpd_tls_wrappermode=yes”. It is normally enabled, but if it’s not working check that it’s not commented out, and also check that Webmin > Networking > FirewallD is not blocking service “smtps”.
Fixing a blacklisted mail server
It’s common for a new mail server to be blacklisted by some email recipients until it has built up a good reputation (Microsoft servers including outlook.com and hotmail.com are notorious for this). If this happens, mails to some destinations will suddenly start bouncing. In any case, many VPS providers block all outgoing emails (port 25) until a server is at least 30 days old and a support ticket has been submitted.
All is not lost – you can simply redirect outgoing messages via a trusted third party server. You will need to set up an account at a reliable mail provider (I use Amazon Simple Email Service) and register all the domains you host, so the external mail service knows how to sign your messages with DKIM and how to handle bounces. It sounds complicated, but it’s really quite easy and inexpensive.
For example, to set up an account at Amazon SES, follow their Developer Guide, in particular the sections on Setting up, Request production access, Obtaining SMTP credentials and Easy DKIM. Make sure the desired region is set consistently at the top right next to your username – if your settings seem to suddenly vanish, this is probably the cause.
Create a file on your server called something like /etc/postfix/sasl_passwd that is only visible to the root user (chmod 0600) containing a single line with the SMTP username and key you were given above. It will look something like this.
[email-smtp.eu-west-1.amazonaws.com]:587 smtp_username:smtp_password
(Where smtp_username and smtp_password are the ones you were given by Amazon.)
Add lines similar to these to /etc/postfix/main.cf
relayhost = [email-smtp.eu-west-1.amazonaws.com]:587
smtp_sasl_auth_enable = yes
smtp_sasl_security_options = noanonymous
smtp_sasl_password_maps = hash:/etc/postfix/sasl_passwd
smtp_tls_note_starttls_offer = yes
Finally, run these commands to make the changes take effect.
sudo postmap /etc/postfix/sasl_passwd
sudo systemctl restart postfix
It’s possible to use postfix transport_maps and sender_dependent_relayhost_maps just for specific source domains or specific destination domains if you wish.
Configuring incoming mail
It’s sometimes very useful to be able to filter incoming messages automatically into folders to reduce clutter in your Inbox. Go to Virtualmin > Email Settings > Spam and Virus Scanning and enable Allow mailbox users to create mail filters to make the Email Filters option appear in Usermin. If you don’t see this option, go to Virtualmin > System Settings > Features and Plugins and enable Spam Filtering temporarily and it will appear. It may not allow you to do this until the Procmail configuration is changed at Webmin > Servers > Procmail Mail Filter to remove the lines above “Set variable LOGFILE…”.
When you’re done, go back to Webmin > Servers > SpamAssassin Mail Filter and click Setup Procmail For SpamAssassin then change Action for messages classified as spam to Deliver normally. Then go back to Virtualmin > System Settings > Features and Plugins and disable Spam Filtering again (because it will interfere with Amavis, see below).
Spam filtering
Virtualmin sets up Clamav virus scanning and Spamassassin spam filtering on incoming email by default. Unfortunately this setup is quite ineffective (doesn’t work with forwarded messages, appalling detection rates for attachments) and uses lots of memory. My preferred solution is to set up Postscreen and Amavis as described below to catch email spam before it causes server load and before messages are forwarded.
I no longer perform automatic virus scanning (as opposed to spam scanning) on emails because sadly almost all the free or reasonable cost Linux virus scanners are now useless or withdrawn. Most mail clients have their own virus protection in any case, which is easier for users to find and configure.
Postscreen
The Postfix postscreen daemon is a useful first step in spam protection – it rejects misbehaving mail clients early, which provides additional protection against mail server overload. It’s disabled by default but easily enabled by adding the following lines at Webmin > Servers > Postfix Mail Server > Edit Config Files > /etc/postfix/main.cf:
# Enable postscreen, see http://www.postfix.org/POSTSCREEN_README.html
postscreen_access_list = permit_mynetworks
postscreen_dnsbl_threshold = 3
# Note: zapbl, hostkarma, 0spam, ascams, spamgrouper, sorbs, octopusdns, virusfree.cz, polspam.pl, gremlin.ru, s5h, senderscore found to be giving false positives, removed.
postscreen_dnsbl_sites = zen.spamhaus.org bl.spamcop.net b.barracudacentral.org bl.mailspike.net truncate.gbudb.net dnsbl.justspam.org spam.spamrats.com dnsbl.threatint.zone ix.dnsbl.manitu.net spam.dnsbl.anonmails.de bl.fmb.la spam.pedantic.org access.redhawk.org bl.nosolicitado.org dnsbl.beetjevreemd.nl
postscreen_dnsbl_action = enforce
postscreen_greet_action = enforce

# Get rid of "postscreen_cache: unable to get exclusive lock" errors
postscreen_cache_map = memcache:/etc/postfix/postscreen_cache
postscreen_cache_cleanup_interval = 0
Note that I have included tests from some reputable DNS blacklists – these can make a big difference to server load. Note also that I have enabled memcached to avoid a problem with “unable to get exclusive lock” errors in the mail log. Memcached is also useful for caching plugins like W3 Total Cache in WordPress. You can install it as described above under “Additional PHP packages”.
Create a simple file called /etc/postfix/postscreen_cache containing these contents:
memcache = inet:127.0.0.1:11211
key_format = postscreen:%s
Then make these modifications to /etc/postfix/master.cf (same Webmin screen):
# Enable postscreen, see https://www.postfix.org/POSTSCREEN_README.html
# 2. Comment out the "smtp inet ... smtpd" service
# 3. Uncomment the new "smtpd pass ... smtpd" service and duplicate any "-o parameter=value" entries from the smtpd service that was commented out in the previous step
# 4. Uncomment the new "smtp inet ... postscreen" service
# 5. Uncomment the new "tlsproxy unix ... tlsproxy" service
# 6. Uncomment the new "dnsblog unix ... dnsblog" service
#smtp inet n - y - - smtpd -o smtpd_sasl_auth_enable=yes
smtp      inet  n       -       y       -       1       postscreen
smtpd     pass  -       -       y       -       -       smtpd -o smtpd_sasl_auth_enable=yes
dnsblog   unix  -       -       y       -       0       dnsblog
tlsproxy  unix  -       -       y       -       0       tlsproxy
Finally restart postfix, send a few test messages in and out and check the mail log at Webmin > System > System Logs Viewer > /var/log/mail.log or using this terminal command:
tail -f /var/log/mail.log
Amavis
Amavis is an interface between postfix and other mail checkers. It performs spam checking earlier than the default Virtualmin setup (before filtering and forwarding) and allows additional spam checks such as Pyzor, Razor and DCC. It’s easy to install from standard Ubuntu packages (there is no Webmin module for this):
sudo apt install amavisd-new pyzor razor opendkim
If you would like Amavis to also scan mail attachments, install some or all of the following as well, but note that this carries a significant security risk because some of these packages are quite old.
sudo apt install arj bzip2 cabextract cpio rpm2cpio file gzip lhasa nomarch pax rar unrar p7zip-full unzip zip lrzip lzip liblz4-tool lzop unrar-free
Amavis must be enabled by uncommenting these lines (at the bottom, not the virus checks) in file /etc/amavis/conf.d/15-content_filter_mode
@bypass_spam_checks_maps = (
   \%bypass_spam_checks, \@bypass_spam_checks_acl, \$bypass_spam_checks_re);
By default, quarantined messages are saved in /var/lib/amavis/virusmails. I prefer to save them in a mailbox where they can be viewed more easily to check that wanted emails aren’t being blocked, and then automatically deleted after 30 days. To set this up, go to Webmin > System > Users and Groups > amavis and click the Login to Usermin button. In Mail > Manage Folders click Add A Folder Of Type “Local Mail File” and give it a name such as “Quarantine”. Use the Auto-Clearing button to enable automatic deletion.
In file /etc/amavis/conf.d/50-user add the following lines.
$sa_tag_level_deflt = -999; # always add spam info headers
$sa_kill_level_deflt = 5; # triggers spam evasive actions
$sa_tag2_level_deflt = 5;
$QUARANTINEDIR = '/var/lib/amavis/Maildir/.Quarantine/new'; # Somewhere easier to read
$quarantine_subdir_levels = 0; # disable quarantine dir hashing
$spam_quarantine_method = 'local:spam-%b-%i-%n'; # Don't gzip files
$enable_dkim_verification = 0;

# Prevents {RelayedOpenRelay} warning
@local_domains_maps = 1;
Note that there are currently some bugs in the Webmin “SpamAssassin Mail Filter” module in this situation. Go to Webmin > Servers > SpamAssassin Mail Filter and If you see a warning message about Procmail not being set up, click Setup Procmail For SpamAssassin and set Action for messages classified as spam to Deliver normally. On the same page, click the Settings cogwheel then go to Command to restart processes and change the setting to this
spamd amavis
In file /etc/postfix/main.cf add this:
content_filter = smtp-amavis:[127.0.0.1]:10024
At the end of file /etc/postfix/master.cf add this:
# https://help.ubuntu.com/community/PostfixAmavisNew

smtp-amavis unix    -   -   -   -   2   smtp
    -o smtp_data_done_timeout=1200
    -o smtp_send_xforward_command=yes
    -o disable_dns_lookups=yes
    -o max_use=20

127.0.0.1:10025 inet  n    -    -    -    -    smtpd
    -o content_filter=
    -o local_recipient_maps=
    -o relay_recipient_maps=
    -o smtpd_milters=
    -o smtpd_restriction_classes=
    -o smtpd_delay_reject=no
    -o smtpd_client_restrictions=permit_mynetworks,reject
    -o smtpd_helo_restrictions=
    -o smtpd_sender_restrictions=
    -o smtpd_recipient_restrictions=permit_mynetworks,reject
    -o smtpd_data_restrictions=reject_unauth_pipelining
    -o smtpd_end_of_data_restrictions=
    -o mynetworks=127.0.0.0/8
    -o smtpd_error_sleep_time=0
    -o smtpd_soft_error_limit=1001
    -o smtpd_hard_error_limit=1000
    -o smtpd_client_connection_count_limit=0
    -o smtpd_client_connection_rate_limit=0
    -o receive_override_options=no_header_body_checks,no_unknown_recipient_checks
Also add the following (indented) two lines immediately below the “pickup” transport service to prevent messages that are generated to report on spam from being classified as spam.
   -o content_filter=
   -o receive_override_options=no_header_body_checks
I add the following additional rules to /etc/spamassassin/local.cf to improve diagnostics, avoid false positives and improve spam rejection.
# Avoids wanted messages getting lost in spam folder
use_bayes_rules 0

# Make it easier to see why messages pass or fail
add_header all Status _YESNO_, Score=_SCORE_, Required=_REQD_, Bayes=_BAYES_, _TESTSSCORES_
fold_headers 1

# Prevents "DNSBL blocked you due to too many queries"
dns_server 127.0.0.1

# Messages from these domains are often spam
header CUSTOM_FROM_BEST From:addr =~ /.best$/i
score CUSTOM_FROM_BEST 3
score DCC_CHECK 3

# Avoid spam getting through by using paid "whitelists"
score RCVD_IN_RP_CERTIFIED -0.001
score RCVD_IN_RP_SAFE -0.001
score RCVD_IN_VALIDITY_CERTIFIED -0.001
score RCVD_IN_VALIDITY_RPBL -0.001
score RCVD_IN_VALIDITY_SAFE -0.001
score RCVD_IN_IADB_VOUCHED -0.001
score RCVD_IN_MSPIKE_H2 -0.001
Restart amavis and postfix and check for success.
sudo systemctl restart amavis postfix
sudo systemctl status amavis postfix
Installing Razor, Pyzor and DCC
The additional spam filtering solutions Razor, Pyzor and DCC (Distributed Checksum Clearinghouse) can together make a big difference to spam filtering. They can be enabled or disabled in file /etc/spamassassin/v310.pre.
loadplugin Mail::SpamAssassin::Plugin::DCC
loadplugin Mail::SpamAssassin::Plugin::Pyzor
loadplugin Mail::SpamAssassin::Plugin::Razor2
To install Razor:
sudo apt install razor
razor-admin -create
razor-admin -register
To install and test Pyzor:
sudo apt install pyzor
pyzor ping
To install and test DCC. It’s not available as an Ubuntu package so we compile from source.
wget https://www.dcc-servers.net/dcc/source/dcc.tar.Z
tar xfvz dcc.tar.Z
cd dcc-2.3.169
CFLAGS="-O2 -fstack-protector" DCC_CFLAGS="-O2 -fstack-protector" ./configure && make && make install
cdcc info
(It’s normal to see some “not answering” servers.)
To test spam filtering, this text from GTUBE can be pasted into a mail message and sent to one of the mail accounts on your VPS.
XJS*C4JDBQADN1.NSBN3*2IDNEN*GTUBE-STANDARD-ANTI-UBE-TEST-EMAIL*C.34X
Checking SPF, DKIM and DMARC of incoming messages
Checking SPF, DKIM and DMARC on incoming messages helps protect against phishing scams and general spam. Webmin has no module for this but it’s fairly easy to set up manually.
Run these commands to install the opendkim and opendmarc packages (opendkim may already be installed) and to set them to start automatically after a reboot. Choose “No” if asked whether to generate a database because it’s only needed to generate DMARC statistics for senders and no-one is likely to be interested in our reports. Opendmarc has a built-in SPF checker so we don’t need another package for that.
sudo apt install opendkim opendmarc
sudo systemctl enable opendkim opendmarc
If outgoing mail is being relayed through a third party as discussed above the appropriate DKIM signatures will usually be supplied by them, but we still need to use opendkim to verify incoming DKIM signatures. You might think you can just configure this in Virtualmin > Email Settings > Domainkeys Identified Mail but it’s full of bugs and I have never been able to get it to work. We’ll set it up manually.
Create a socket for postfix to use from its “chrooted” location:
sudo mkdir /var/spool/postfix/opendkim
sudo chown opendkim:postfix /var/spool/postfix/opendkim
In file /etc/opendkim.conf add the following values at the bottom to change the mode to “verify only” and enable autorestart.
Mode v
Socket local:/var/spool/postfix/opendkim/opendkim.sock
AutoRestart yes
AutoRestartRate 10/1M
Also change the SOCKET and DAEMON_OPTS settings in /etc/default/opendkim
SOCKET=”local:/var/spool/postfix/opendkim/opendkim.sock”
DAEMON_OPTS="-b v"
Add the milter to postfix by adding these lines to /etc/postfix/main.cf. Comment out the original entries for smtpd_milters and non_smtpd_milters.
milter_default_action = accept
milter_protocol = 6
smtpd_milters = local:opendkim/opendkim.sock
Restart opendkim and postfix and check the status.
sudo systemctl restart opendkim postfix
sudo systemctl status opendkim postfix
Send yourself an email and examine the headers – look for Authentication-Results: containing dkim=pass. Also check for errors in /var/log/mail.log.
Now we do a similar set of setup steps for opendmarc. Run these commands to create a socket file and a user with the right permissions
sudo mkdir /var/spool/postfix/opendmarc
sudo chown opendmarc:opendmarc /var/spool/postfix/opendmarc
sudo chmod 750 /var/spool/postfix/opendmarc
sudo adduser postfix opendmarc
In file /etc/opendmarc.conf set the following values:
AuthservID OpenDMARC
Socket local:/var/spool/postfix/opendmarc/opendmarc.sock
IgnoreAuthenticatedClients true
RequiredHeaders true
SPFSelfValidate true
In /etc/postfix/main.cf find the line beginning smtpd_milters and add to the end of it ,local:opendmarc/opendmarc.sock
smtpd_milters = local:opendkim/opendkim.sock,local:opendmarc/opendmarc.sock
Restart and check opendmarc, postfix, spamd and amavis
sudo systemctl restart opendmarc postfix spamd amavis
sudo systemctl status opendmarc postfix spamd amavis
Send yourself an email and examine the headers to check that it’s working. If you find that you’re getting a lot of spam from an identifiable sender, you can modify the filtering at Webmin > Servers > Spamassassin Mail Filter > Header and Body Tests > Switch to advanced mode. The default settings in Webmin don’t work, but with a bit of research into regular expressions you can get good results. For example, to reduce spam from emails using the top-level domain ‘best’, try creating a rule called something like FROM_BEST_DOMAIN for header From:addr that matches regular expression /\.best$/i with a score of 1 point.
Reporting spam
Spammers now change their sending IP address and “from” name every few seconds to avoid spam filters. They also change the contents of their messages and hide key words in images. This means that traditional spam filters based on keyword lists and Bayesian training using a “Spam” or “Junk” folder are becoming ineffective (and I no longer recommend using a Spam folder at all, because wanted messages get lost there). What does work are the reputation services (like DCC and Razor and the DNS blacklists) that respond in real time to reports of the latest offenders. But where do these reputation services get their data? They rely on users reporting messages as spam.
There’s no point reporting old spam – the spammers will have moved on. But fresh, persistent, annoying spam is worth reporting, and there are two methods I use for that.
Webmin has a built-in reporting system. Go to Webmin > Servers > Read User Mail or login to Usermin and find the message you want to report. At the right you’ll find an orange “Report Spam” button. This uses the Spamassassin reporting system.
The second method I use is to copy the message headers to www.spamcop.net. This system is good at removing obfuscation attempts and revealing the true source of spam, then sending an abuse complaint to the right people.
Replacing Apache with nginx
(Optional) Many people prefer nginx over Apache due to its speed and ability to handle large numbers of visitors. To install nginx instead of Apache you need to add the following switch when running install.sh when you first install Virtualmin. It’s best to start with a “clean” server when doing this, because the install.sh script is not designed to run multiple times.
Note that nginx doesn’t process .htaccess files and therefore breaks WordPress permalinks, unless nginx is manually configured or configured on top of Apache as a “reverse proxy”, which is not what this command will do.
sudo /bin/sh install.sh --bundle LEMP
I found it necessary to add these lines to /etc/sysctl.conf, otherwise nginx won’t automatically start after the server is rebooted.
net.ipv4.ip_nonlocal_bind = 1
net.ipv6.ip_nonlocal_bind = 1
Also, make sure apache2 is disabled in this situation because that can also cause the same problem.
systemctl disable apache2
Replacing Apache with OpenLiteSpeed
(Optional) Virtualmin assumes you will use Apache as your webserver, but that’s not necessarily the best choice these days. Alternatives such as nginx, varnish and litespeed offer significant advantages in speed and memory usage. I recommend OpenLiteSpeed because it’s free and compatible with WordPress (specifically, it can understand permalinks in .htaccess files). There is currently no OpenLiteSpeed configuration module for Webmin but it comes with its own dashboard and by following the steps below you can install it as (almost) a drop-in replacement for Apache. You can freely switch back and forth between the two and you could even run them in parallel on the same machine (on different ports or IP addresses), though that’s outside the scope of this tutorial.
The first step is to install and start OpenLiteSpeed, which can be done without interfering with Apache.
sudo wget -O - https://repo.litespeed.sh | sudo bash
sudo apt update
sudo apt install openlitespeed
sudo systemctl start lshttpd
sudo systemctl enable lshttpd
Set the admin username and password using this command (or use the defaults set in /usr/local/lsws/adminpasswd).
/usr/local/lsws/admin/misc/admpass.sh
By default firewalld will block ports 7080 and 8088 which you need to view the OpenLiteSpeed administration page and the example site. You can unblock them at Webmin > Networking > FirewallD > Add allowed port. Click the Reload FirewallD button for the new rules to take effect.
The admin page is initially set up with a self-signed certificate that will trigger a warning in most browsers. You can fix this by editing the listener adminListener settings at the bottom of file /usr/local/lsws/admin/conf/admin_config.conf to use the webmin certificates for your server. You can find the location of those certificates at Webmin > Webmin Configuration > SSL Encryption (two files ending in .key and .combined). Restart lshttpd.
You should now be able to see the OpenLiteSpeed WebAdmin page in a web browser by adding :7080 to the end of your server address (for example, https://server.mydomain.com:7080). Have a look around – most options have a question mark symbol next to them that you can click to find out what they do.
Check the Server Error Log at the bottom of the dashboard. You should see lots of NOTICEs but no WARNINGs or ERRORs at this stage.
The next thing to check is the example hosted webpage at port 8088 (e.g. http://server.mydomain.com:8088). Click the button under Test PHP to make sure PHP is working – you should see a “phpinfo” page with lots of information.
The next problem is that Apache normally runs as user “www-data” but OpenLiteSpeed runs as user “nobody”. This will cause permission errors if we try to access files created by one webserver using the other webserver. The easiest way to fix this is probably to make the OpenLiteSpeed server run as www-data. There’s no option to change this in the OpenLiteSpeed dashboard but you can edit the configuration file /usr/local/lsws/conf/httpd_config.conf manually – at the top of the file simply change both the user and group to www-data. Then “reinstall” the server to fix existing file permissions and restart.
systemctl stop lshttpd
rm -rf /tmp/lshttpd /usr/local/lsws/logs
apt reinstall openlitespeed
systemctl start lshttpd
systemctl status lshttpd
Before we add sites, we need to check the server configuration which holds default settings for all the virtual sites. Several settings need tweaking here.
- In Server Configuration > General check that the user and group are www-data
- Under Server Process, Set CPU Affinity to 1 for better performance
- If using Cloudflare for DNS, under General Settings set Use Client IP in Header to Trusted IP Only
- In the Log tab under Server Log I increase Rolling Size to 100M, otherwise important debug information tends to be discarded too soon
- Set Keep Days to 90
- Set Compress Archive to Yes for both server and access logs
- Repeat the above three steps for Access Log
- In Tuning > SSL Global Settings set Default Cipher Suite to ECDHE-ECDSA-AES128-GCM-SHA256:ECDHE-RSA-AES128-GCM-SHA256:ECDHE-ECDSA-AES256-GCM-SHA384:ECDHE-RSA-AES256-GCM-SHA384:ECDHE-ECDSA-CHACHA20-POLY1305:ECDHE-RSA-CHACHA20-POLY1305:DHE-RSA-AES128-GCM-SHA256:DHE-RSA-AES256-GCM-SHA384:DHE-RSA-CHACHA20-POLY1305
In Server Configuration > Security, if multiple sites are to be sharing this server change these settings for better security:
- Set Follow Symbolic Link to If Owner Match
- Enable Check Symbolic Link
- Enable Force Strict Ownership
- If using Cloudflare for DNS, add these IP addresses to Server Configuration > Security > Access Control > Allowed List
ALL, 103.21.244.0/22T, 103.22.200.0/22T, 103.31.4.0/22T, 104.16.0.0/12T, 108.162.192.0/18T, 131.0.72.0/22T, 141.101.64.0/18T, 162.158.0.0/15T, 172.64.0.0/13T, 173.245.48.0/20T, 188.114.96.0/20T, 190.93.240.0/20T, 197.234.240.0/22T, 198.41.128.0/17T, 199.27.128.0/21T
Install the latest version(s) of lsphp (8.3 in this example):
sudo apt install lsphp83 lsphp83-{common,curl,mysql,opcache,imap,imagick,intl,memcached,apcu,redis}Warning: Do NOT try to remove any of the old lsphp packages using apt. There is a bug that makes a mess of the Apache PHP setup if you try this.
In the System Configuration > External App tab we update and configure PHP support for each version (the “Lightspeed SAPI App”).
- Change the Name to something identifiable such as lsphp83
- Change the Address to something identifiable such as uds://tmp/lshttpd/lsphp83.sock
- Increase Max Connections to something like 100 otherwise the server may run very slowly under load
- Increase PHP_LSAPI_CHILDREN to the same value (it should always match Max Connections)
The default php version for the whole OpenLiteSpeed server is set at Server Configuration > Script Handler > php > Handler Name. Change this to lsphp83. Click Save and Graceful Restart.
To increase PHP resources, enable error logging and improve security under OpenLiteSpeed, find the php.ini file, which in our case is located at /usr/local/lsws/lsphp83/etc/php/8.3/litespeed/php.ini. I add the following settings to the end of the file:
; Enable PHP error logging
error_reporting = E_ALL & ~E_DEPRECATED & ~E_STRICT
log_errors = on
error_log = error_log

; Mitigate cookie hijacks
session.cookie_samesite = "Lax"
session.cookie_httponly = 1
session.cookie_secure = 1

; For sites that need more resources
memory_limit = 1500M
max_execution_time = 60
upload_max_filesize = 100M
post_max_size = 100M
max_input_vars = 2000

; Fix session files not being deleted and exhausting the inode pool
session.save_path = "/var/lib/php/sessions"

; Fix Nextcloud warnings
opcache.memory_consumption = 1536
opcache.interned_strings_buffer = 128
opcache.max_accelerated_files = 50000
output_buffering = 0
apc.enable_cli = 1

; Fix Matomo warnings
mysqli.allow_local_infile = On
To restart PHP, execute the following command (restarting lshttpd is not enough if PHP is “detached”, see https://openlitespeed.org/kb/php-detached-mode/)
killall -9 lsphp
Adding Listeners
If this all works, the next step is to add some OpenLiteSpeed “Listeners”, which specify the allowed IP addresses and ports. If Apache is running, it will already be using port 80 (and port 443 for secure connections), so for now I will assume we will temporarily use alternative ports for testing OpenLiteSpeed, such as 8080 and 8443. Don’t forget to enable them in the firewall as described above.
If you don’t mind disrupting existing sites and prefer to set the listener ports to the normal ones (80 and 443) immediately, you will need to first stop Apache and prevent it starting automatically at boot time using the commands below. This will of course cause all currently hosted sites on this server to go offline temporarily. Do NOT uncheck the “Apache website enabled” setting in any site’s “Edit Virtual Server” settings in Virtualmin because that would cause all their html files to be removed.
sudo systemctl stop apache2
sudo systemctl disable apache2
In the OpenLiteSpeed WebAdmin dashboard go to Listeners > Add (the plus sign at the right) and call the new listener something like “IPv4”. Set the port to 80 and Secure to No. Click the Save button at the top right.
We will also need at least one listener for SSL connections. Virtualmin can continue to control the generation of SSL certificates using LetsEncrypt as usual, but their location is a little tricky to find.
For the default listeners we ideally want to find the location of the certificates generated for the hostname of the server. They are used by the Virtualmin > Web Configuration > Preview Website feature, for example. Virtualmin creates a virtual site for the hostname (because LetsEncrypt needs a site for the acme challenge), but its location varies according to the setting in Virtualmin > System Settings > Virtualmin Configuration > SSL Settings > Setup Let’s Encrypt SSL certificate for hostname. I suggest using the default setting Yes. (If you set it up elsewhere, note that mail should NOT be enabled on that site.)
We will also need to check the default SSL certificate location in Virtualmin (because OpenLiteSpeed doesn’t know what a Virtualmin “${ID}” is). In Virtualmin > System Settings > Server Templates > Default Settings > SSL website for domain change the Template for private key path to File in home directory if it’s not already set. Repeat for the Settings For Sub-Servers template. If any existing sites have been set up in different locations, you can move the keys and reconfigure the locations in Virtualmin > Web Configuration > Configure SSL Website > SSL Options.
There’s another complication. The certificates we found above in Webmin for the OLS adminListener consisted of a separate “.key” and “.cert” file (with no ca file). The certificates generated by Virtualmin for each individual site seem to generate a “.key” file plus a “.combined” file containing both “cert” and “ca” certificates, plus some others that don’t always get updated. It’s a mess.
Let’s assume the certificates for the hostname are the default place, which is /home/._default_hostname/ssl.key and /home/._default_hostname/ssl.combined.
Give your new listener a name such as “IPv4_SSL”. In Address Settings select ANY IPv4 and Port 443 and set Secure to Yes and save it.
- In the SSL tab set Private Key File to the path to the file ending in “.key” and Certificate File to the file ending in “.combined”. Set Chained Certificate to Yes.
- Under SSL Protocol select just TLS v1.2 and TLS v1.3
- Select YES for Enable ECDH Key Exchange
- Select YES for Enable OCSP Stapling
If your server has an IPv6 address you should create a similar pair of listeners for that. Click Save and Graceful Restart. Check in the dashboard under Listeners that the status of all listeners is green.
Create a Virtual Host Template for OpenLiteSpeed
For this tutorial I’ll assume we will add a test site test.mydomain.com. Whichever site you use, make sure it works properly with Apache first, including SSL connections and logging.
Usually there will be multiple virtual hosts with similar configurations, so we start by creating a template in OpenLiteSpeed > VHost Templates. (The process for creating a single virtual host without using a template is very similar and starts at OpenLiteSpeed > Virtual Hosts.) Click the plus sign at the top right, choose a name (e.g. ‘Virtualmin’), set Template File to $SERVER_ROOT/conf/templates/virtualmin.conf and Mapped Listeners to IPv4, IPv4_SSL, IPv6, IPv6_SSL (or whatever names you chose above). Click Save and then CLICK TO CREATE and Save again.
Click the VHost template you just created, then:
- in General > Base set Default Virtual Host Root to /home/$VH_NAME (we won’t actually use this, but OpenLiteSpeed insists on a name containing $VH_NAME)
- Set Config File to $SERVER_ROOT/conf/vhosts/$VH_NAME/vhconf.conf
- Under Base2 set Document Root to $VH_ROOT/public_html/
- Set Administrator Email to root@localhost
- Under php.ini Override at the bottom set php_value error_log “$VH_ROOT/logs/php_log”
- In the Log tab set Use Server’s Log to No
- Set File Name to /var/log/virtualmin/$VH_NAME_error_log
- Set Log Level to DEBUG – this won’t take immediate effect but will allow us to turn it on later
- Set Rolling Size to 100M
- Set Keep Days to 90
- Set Compress Archive to Yes
- Under Access Log, for Log Control select Own Log File
- Set File Name to /var/log/virtualmin/$VH_NAME_access_log. Note that OpenLiteSpeed unfortunately won’t allow the use of $VH_DOMAIN here.
To execute PHP and other external apps with the correct permissions, we go to the Security tab and
- In the File Access Control tab set Follow Symbolic Link to If Owner Match
- Set both Enable Scripts/ExtApps and Restrained to Yes
- Under Security > External App Security set External App Set UID Mode to DocRoot UID
Many sites (including WordPress) set rewrite rules in .htaccess files, so it’s a good idea to enable these by default.
- In the Rewrite tab set Enable Rewrite to Yes
- Set Auto Load from .htaccess to Yes
- Set Log Level to 0
Save and then set the following Rewrite Rules to always redirect insecure http requests to https by default, except for the “well-known” folder which is used by LetsEnrypt when setting up certificates.
RewriteCond %{HTTPS} off
RewriteRule ^/(?!.well-known)(.*)$ https://%{HTTP_HOST}/$1 [R]
In the Context tab, create a Static instance
- Set the URI to “/” (without the quotes)
- Set Accessible set to Yes
Add the following statements in the Header Operations box, for extra security (perhaps copied from the Apache configuration above).
set Content-Security-Policy-Report-Only "upgrade-insecure-requests; default-src 'self'; style-src 'self'; style-src-elem 'self'; script-src 'self'; img-src 'self'; font-src 'self'; media-src 'self'; frame-src 'self'; connect-src 'self';"
set Strict-Transport-Security "max-age=15768000"
set X-Content-Type-Options "nosniff"
set Referrer-Policy "no-referrer-when-downgrade"
set X-Frame-Options "sameorigin"
set X-Permitted-Cross-Domain-Policies "none"
set X-XSS-Protection  "1; mode=block"
In the SSL tab:
- Set the Private Key File to $VH_ROOT/ssl.key
- Set the Certificate File to $VH_ROOT/ssl.combined
- Set the Chained Certificate to Yes
- Enable OCSP Stapling
- Enable ECDH Key Exchange
Adding new sites to OpenLiteSpeed
We can now add a site corresponding to the server hostname (test.mydomain.com in our example). First set up DNS records for it and check that it works with Apache.
Then in OpenLiteSpeed go to VHost Templates, click the template name we created above (“Virtualmin” in our example) and click the plus sign for Member Virtual Hosts. Set the Virtual Host Name to the domain of the site we are adding, “server.mydomain.com” in this example. For a site that uses email, you should also add the “mail” alias that Virtualmin needs in Domain Aliases (“mail.test.mydomain.com” in our example). A “www” alias is created automatically, so you don’t need to worry about that.
Set Member Virtual Host Root to the path of the folder immediately above public_html, which you can find in Virtualmin > Edit Virtual Server > Home directory. This will often be something like “/home/mysite”, or if it’s a sub-site, something like “/home/parent/domains/mysite.com”.
Click Save and Graceful restart.
If you point your browser to https://test.mydomain.com a holding page should appear, without warnings. The visit should appear in the access logs in Virtualmin, and PHP and permalinks in /htaccess files should work
Problems?
- If you see This site can’t be reached, try clearing your browser cache, restarting your browser, using “Incognito” mode, forcing a refresh using Ctrl+F5 or using a completely different browser or a different device.
- Check the OpenLiteSpeed > Dashboard > Server Error Log for errors or warnings.
- Check that the site still works if you stop the OpenLiteSpeed server and start Apache instead. If not, check that DNS records are set up and there are no typos in the name.
- Cache and certificate “pinning” problems are common. Try using a different browser (even a different device) and try “Incognito” mode. Clear the browser cache and cookies. Force a page refresh using Ctrl + F5.
- Make sure all Virtual Hosts are connected to one or more Listeners.
- Make sure the OpenLiteSpeed server has been restarted since the last configuration change.
- Try setting file permissions to 0755 recursively. If this works, check and fix file ownership before setting permissions back to 0750.
- Check the standard error log for PHP errors, especially ones about increasing LSAPI_CHILDREN. It is enabled at OpenLiteSpeed > Server Configuration > Log > Enable stderr Log and can be viewed at /usr/local/lsws/logs/stderr.log.
- You can disable individual sites temporarily in the Virtual Hosts tab under Live Feeds on the main dashboard page (visitors to that site will see a 403 “access denied” error).
You should enable and configure the LiteSpeed Cache for each site individually by installing the plugin of that name in every WordPress site you host. The default settings work pretty well – go to Presets and work your way up from Essentials, testing as you go. You should see a significant improvement in page load speed and visitor capacity.
It’s also possible to enable the OpenLiteSpeed cache for sites that don’t or can’t install a LiteSpeed Cache plugin, but this can be dangerous, so test well. Go to OpenLiteSpeed > Server Configuration > Modules > Cache and set enableCache to 1. You can test whether a site is successfully cached at https://check.lscache.io/.
So, here’s a checklist of the steps needed to migrate a site from Apache to OpenLiteSpeed.
- If the site is currently on a completely different server, migrate it using the usual Virtualmin tools (Create Virtual Server, Move Virtual Server, Transfer Virtual Server, Import Virtual Server, Migrate Virtual Server, Restore Virtual Server).
- In the OpenLiteSpeed dashboard, add a Member Virtual Host to the VHost Template. The Virtual Host Name should be the domain name and the Member Virtual Host Root should point to the folder above public-html.
- Check the SSL certificate paths and the log paths carefully. Again, subdomains and older versions of Virtualmin have different locations. If any are wrong, you can adjust the certificate paths in Virtualmin > Services > Configure SSL Website > SSL Options and adjust log paths at Virtualmin > Server Configuration > Website Options. Alternatively, to fix a compatibility issue from the OpenLightSpeed side, click the Instantiate button to the right of the Virtual Host Name in VHost Templates > Member Virtual Hosts to create an individual Virtual Host and make changes there. If you do this, check that your Listeners point to this new Virtual Host. Also don’t forget to do a Graceful Restart of OpenLiteSpeed.
- Change your DNS settings to point to the new server. Allow time for the changes to propagate. If you’re impatient you can add entries to the /etc/hosts file on the server and/or on your PC, typically at C:\Windows\System32\drivers\etc\hosts. Clear browser caches.
- You should be able to see your home page now, but pages that use permalinks may not be there. In WordPress, go to Settings > Permalinks and click Save Changes. Then do another Gracefult Restart of OpenLiteSpeed.
- Uninstall any old cache plugins in WordPress and install and activate the LiteSpeed Cache plugin.
- Check that everything still works with Apache running, in case of problems. Validate the server at Virtualmin > Limits and Validation.
You may have to tweak some .htaccess files to get them working. For example, the CiviCRM .htaccess file at /wp-content/uploads/civicrm/upload/.htaccess has been fixed but they forgot /wp-content/uploads/civicrm/ConfigAndLog/.htaccess and /wp-content/uploads/civicrm/custom/.htaccess. Here’s the code you may need to add to those .htaccess files.
<Files "*">
# OpenLiteSpeed 1.4.38+
  <IfModule !authz_core_module>
    RewriteRule .* - [F,L]
  </IfModule>
</Files>
Installing web sites
Web sites can be created by going to Virtualmin > Create Virtual Server and entering the domain name you will use and an administrator password. The default settings are usually OK and come from Virtualmin > System Settings > Server Templates.
You can also create “Sub-servers” and “Alias” servers. Alias servers are useful if for example you have both a “.com” and a “.co.uk” domain – website visitors and mail users can use either domain and will see the same website or reach the same mailbox. Sub-servers are useful if one administrator is managing several different sites – if they all have the same owner then there’s no need to log in and out to move between them.
It’s possible for many sites to share the main IP address of the server, you don’t need multiple IP addresses anymore (because all modern browsers support “SNI“).
The default limits for memory, upload size and execution times for PHP are quite restrictive and you will probably want to increase them. You can change the default settings at Webmin > Tools > PHP Configuration > /etc/php/8.3/fpm/php.ini > Manage > Resource Limits. I increase the default Maximum file upload size and Maximum HTTP POST size to 100M and the maximum memory to 512M. Individual sites can be configured at Virtualmin > Web Configuration > PHP-FPM Configuration > Resource Limits.
Installing WordPress
By popular demand, here are some instructions for what is often the final step – installing a Content Management System (WordPress) under Virtualmin.
First, create a virtual server (Virtualmin > Create Virtual Server) for the domain name that your WordPress website will use (let’s call it mydomain.com). Specify a long unique administrator password and make sure the option “Setup SSL website too?” is checked under Enabled Features.
If your DNS records are already set up and have had time to propagate, you should be able to browse to www.mydomain.com. You should see the message “Forbidden. You don’t have permission to access / on this server.” because there are no files there yet.
Next go to Virtualmin > Server Configuration > SSL Certificate > Let’s Encrypt and click the “Request Certificate” button. That will replace the self-signed certificate with a proper domain certificate, which avoids browser warnings.
Now open a file manager – I use WinSCP but you can also use Webmin > Others > File Manager. Browse to the folder /home/[your domain]/public_html. It’s probably empty. Download the latest version of WordPress from the download page to your PC and then upload it to the public_html folder (File > Upload to current directory) and unzip it (right click > Extract). A folder called “WordPress” should have been created. Open this folder, select all the contents (there’s a “Select All” button at the top) and cut and paste them up one level to the public_html folder.
Check the ownership of these files. If you are logged in as a server administrator, they may be owned by root:root instead of something like mydomain:mydomain. If so, go up one level, right-click on public_html, select Properties > Change Ownership and enter the existing values for the public_html folder but with the “Recursive” box checked.
Note that Virtualmin now adds a holding page called index.html to new sites – you will need to delete this file, because it takes priority over the default index.php file that WordPress uses.
Now if you browse to your site you should see a “Welcome to WordPress” message and some instructions. Click “Let’s Go!”. The next screen asks for the database name, which you will find in Virtualmin > Edit Databases, and the username and password, which you will find in the Passwords tab by clicking the little key symbol. Click “Submit”. If all is well, you can now fill in the site name, admin username and password to complete the installation and log in as an administrator.
To make connections to the site secure, you can go to Settings > General and change WordPress Address (URL) and Site Address (URL) from http:// to https://.
Securing web sites
It’s risky to transmit passwords in plain text when logging in to a web site or a mailbox – especially on a public network such as an open Wifi connection. To minimise the chances of users doing this accidentally, I enforce encrypted connections for passwords everywhere.
You can enable SSL (secure sockets layer) connections for one site on your server simply by going to Virtualmin > Edit Virtual Server > Enabled features and checking the box “SSL website enabled?”. This will immediately allow encrypted connections to this site with a URL that begins “https” rather than “http”. However, the automatically-generated certificate is “self-signed” which means users will get browser warning that the connection can’t be trusted (because there might be a man-in-the-middle intercepting the encrypted traffic). The solution is to install a free LetsEncrypt certificate by going to Virtualmin > Server Configuration > SSL Certificate > Let’s Encrypt > Request Certificate. If you’ve done everything correctly your web site will now load with no warnings.
Now that all modern browsers support Server Name Indication (in particular, Internet Explorer on Windows XP is officially obsolete) it’s no longer necessary to have a separate IP address for each site that uses an SSL certificate.
You can make sites even more secure (and improve your search engine ranking) by redirecting insecure connections to the secure version automatically. In Virtualmin > Server Configuration > Website Options select “Yes” for Redirect all requests to SSL site? To make this the default for new sites, set it in Virtualmin > System Settings > Server Templates > Website for domain.
The most common route by which hackers gain access to a WordPress site is through plugins and themes that haven’t been updated. Fortunately, WordPress can now update most of them automatically. Unfortunately, automatic updates are disabled by default. To enable them, go to Dashboard > Plugins, click the checkbox at the top left of the plugin table, and under “Bulk actions” select “Enable Auto-updates“. Then go to Appearance > Themes, click each theme individually and select “Enable Auto-updates”.
Other common security problems are weak passwords (the WordFence plugin has a useful setting for enforcing strong ones), human error, a compromised administrator’s computer and leaving forgotten and unmaintained “staging” sites on a server.
Of course, it’s important to keep all the server packages (including PHP) fully patched as well. Periodically (at least once a month) I manually run these commands from a command prompt:
sudo apt update
sudo apt full-upgrade
sudo apt autoremove
That last “autoremove” is important because if you don’t run it occasionally, the /boot partition (which is quite small) may fill up with old kernel versions. If that happens the machine may fail to reboot, which makes it really hard to repair.
Updates occasionally cause problems, so make sure you have a recent snapshot or backup. You may have to reverse the changes or even roll back the whole server, which is why I run the above commands manually, late at night.
Testing and monitoring
You should check log files regularly at Webmin > System > System Logs for the whole system and at Virtualmin > Logs and Reports for individual sites for signs of problems or malicious activity. I find it useful to include these logs in the System Logs screen by clicking the cogwheel at the top left.
/var/log/fail2ban.log Fail2ban log
/var/log/mysql/error.log MySQL error log
/var/log/php8.3-fpm.log PHP-FPM 8.3
There are a number of very useful free services that can be used to monitor your sites:
- Logwatch – Analyses logs and sends a daily digest to the administrator. Needs installation.
- Dnssy – checks all your DNS settings
- F8lure – pings your server once a second to check for network problems or CPU overload, alerts when down
- Mxtoolbox – alerts when blacklisted, can also “port scan” your firewall and other useful DNS queries
- Uptime Robot – checks how fast your pages load once a minute, alerts when down. A phone app is available for “push” notifications. Include a check for a keyword on the page that only appears when PHP is working, otherwise you might miss warnings when PHP is down.
- Loader – simulates many simultaneous users
- Matomo (formerly Piwik) – Similar to Google Analytics but hosted on your own server, shows how your visitors behave
- SSL Labs server test – Checks SSL installation
- Postmark – Free application that receives and parses DMARC reports and emails you the results weekly
I suggest enabling these scheduled update and validation checks:
- Webmin > System > Software Package Updates > Scheduled checking options
- System Information > Virtualmin Packages > Scheduled checking options
- Virtualmin > Limits and Validation > Scheduled Validation
- Webmin > System > Scheduled Cron Jobs – create a job that runs regular virus scans (such as rkhunter)
- Webmin > Others > System and Server Status – Enable Scheduled Monitoring of Postfix, SSH, Webmin, Dovecot, Apache, MySQL, Webmin, Free Memory, Load Average and Disk space
If you want to test your setup at home before paying for commercial hosting, you can easily do so using a virtual machine. VirtualBox is free and easy to use and runs on Windows, MacOS, Linux and Solaris. Create a virtual machine with at least 1 GB of RAM and 20 GB of disk space and set the network mode to “bridged”. Then download the operating system you plan to use as an “iso” file, mount it as a virtual CD, reboot the virtual server and follow the installation prompts.
Tuning performance and memory usage
If your server starts running slowly or crashing, go to the Webmin dashboard and click on any of the dials in the System Information area that are red, to find out which processes or sites are using the most resources. Then go to Virtualmin > Logs and Reports > Apache Access Log to see what is going on. You may find an automated attack is the cause, and that can usually be blocked with an appropriate Fail2ban jail.
I strongly suggest testing your site with a (free) service such as Loadimpact to ensure it can withstand a sudden spike in traffic. If you find problems, check the settings below.
Tune pm.max_children
Try increasing or decreasing the value of pm.max_children in Virtualmin > Services > PHP-FPM Configuration > Edit Configuration Manually. If it’s too high the whole server may crash or freeze under load. If it’s too low you may see warnings like these in your PHP logs (e.g. /var/log/php8.3-fpm.log):
WARNING: [pool xxxxxxxxxxxx] server reached max_children setting (10), consider raising it
To find the corresponding configuration file, make a note of the pool number (xxxxxxxxxxxx in the example) then find the matching file with a .conf extension in the pool.d folder, such as /etc/php/8.3/fpm/pool.d/xxxxxxxxxxxx.conf. Change the pm.max_children value there then restart the PHP server – simply click the restart symbol beside it on the Webmin dashboard.
Tune MySQL
Tuning databases is a big subject but a good place to start is to check the error log at /var/log/mysql/error.log to see if there are any warnings or suggestions about low resources.
Some distributions (but not Ubuntu 24.04) enable “bin logs” in MySQL or MariaDB by default and these can take up a huge amount of disk space in /var/lib/mysql. They are only required if the database is being replicated to another server, and can be safely disabled by adding the statment skip-log-bin to the bottom of /etc/mysql/mysql.conf.d/mysqld.cnf. Note that it is NOT safe to delete the bin logs manually.
Increase swap size
The default size of “swap” memory may be a bit small. You can increase it to say 8 GB using these commands:
sudo swapoff -a
sudo fallocate -l 8G /swapfile
sudo chmod 600 /swapfile
sudo mkswap /swapfile
sudo swapon /swapfile
sudo cp /etc/fstab /etc/fstab.bak
echo '/swapfile none swap sw 0 0' | sudo tee -a /etc/fstab
Attaching additional storage
If you start to run out of disk space, make sure you are not wasting space on temporary files or old unwanted backups before paying for a larger VPS or addtional attached storage. You can browse for the biggest folders using the useful command-line utility ncdu (norton commander disk usage).
sudo apt install ncdu
cd /home
sudo ncdu
If the folders that take up the most space are unimportant or don’t need to be constantly connected to the internet, consider downloading them and archiving them elsewhere. Old websites that are no longer updated are often very vulnerable to hacking and shouldn’t be kept online longer than necessary.
If that’s not possible, look for cheap storage that can be attached to a VPS. HDD storage is relatively slow, but that might not matter for archive files that are rarely accessed. Adding additional storage this way to your server as needed could allow you to offer essentially unlimited mailbox and archive storage (terabytes!) to your users.
Attaching storage to an existing VPS and moving some of your larger folders there is fairly easy, but you do need to be careful not to lose the protection they had from encryption, virus scans and backups, as discussed below. You will probably need to manually create some “symlinks” to the new locations so that website software will still find the files in the expected places.
Use the control panel at your hosting provider to purchase and attach the amount of storage you want and choose your existing VPS to attach the storage.
Optionally, we can encrypt this storage and set it to be automatically mounted and unlocked if the the server is rebooted. It’s best to encrypt data with your own key so the data can’t be inadvertently exposed if the additional storage is disconnected or connected to the wrong server. Ideally that key should be stored elsewhere and entered manually after a reboot, but if you’ve followed the tutorial this far, your main VPS hard disk is already encrypted this way so it’s fairly safe to store the key for additional storage on the main VPS and have it mount from there automatically.
Here are example instructions that will encrypt and mount the attached storage. I’ll assume the host has attached the block device at /dev/vdb – you can check this with the lsblk command. You will be prompted for a passphrase – I suggest choosing a fairly long string of random characters that can be typed from any keyboard (no special characters). The steps to add a partition and to mount in a “storage” subdirectory aren’t strictly necessary but can help avoid problems later.
sudo apt install cryptsetup
sudo lsblk
sudo parted -s /dev/vdb mklabel gpt
sudo parted -s /dev/vdb unit mib mkpart primary 0% 100%
sudo cryptsetup luksFormat /dev/vdb1
sudo cryptsetup luksOpen /dev/vdb1 storage
sudo mkfs.ext4 /dev/mapper/storage
sudo mkdir /mnt/storage
sudo mount /dev/mapper/storage /mnt/storage
Your additional storage should now be available in folder /mnt/storage. Check that you can create and access files there.
If you save the passphrase in a file (e.g. /root/storage_passphrase) we can use it to automatically mount and unlock the additional storage whenever the server reboots. The example options in fstab improve performance and allow the system to continue booting even if there’s a problem with the attached storage.
sudo chmod 0600 /root/storage_passphrase
sudo echo storage /dev/vdb1 /root/storage_passphrase luks >> /etc/crypttab
sudo echo /dev/mapper/storage /mnt/storage ext4 defaults,noatime,nofail 0 0 >> /etc/fstab
sudo update-initramfs -u
We can now free up some space by moving some of those large folders to the new attached storage. Let’s say we want to move all the user mailboxes for site example.com. You can use the Webmin File Manager or WinSCP to find them (e.g. in the /homes folder of the site) then move them to a folder under /mnt/storage. Then, create a symlink in the original location that points to the new location. Make sure the ownership and file permissions of the symlink and the destination folder match the original user and group.
To make sure the additional storage is backed up in external backups (note that it is usually NOT included in normal snapshot backups), we need to tell Virtualmin backups to follow symlinks (which are normally ignored). You can do this by adding this parameter (note there are two leading hyphens) to Virtualmin > System Settings > Virtualmin Configuration > Backup and restore > Additional parameters to tar command.
--dereference
If you also use Duplicacy for backups, it will follow a symlink in the root of the “repository” folder (but no others). A single symlink from /home/storage to /mnt/storage will achieve what we want and can be created using the following simple command. It’s fine for the user and group to be “root” in this case.
ln -s /mnt/storage /home/storage
Backups
Your websites could vanish without warning, even at a large reputable host. It has happened to me more than once. Common causes are denial of service attacks, your site being hacked, the host going out of business, power or network failure, an expired credit card or simple human error. Your hosting provider may be swamped with calls and unresponsive when this happens. If you have a recent off-site backup and control of your domain names you can recover everything within a couple of hours – if not, recovery may be lengthy or impossible. Backups are important!
Virtualmin backups
Virtualmin can make scheduled backups of all files, database contents, email accounts and settings and send them to an external SFTP server or an Amazon S3 bucket. Set them up at Virtualmin > Backup and Restore > Scheduled Backup. I give the backup files a name like incremental_%Y-%m-%dT%H%M.
Note: Backups to some external SSH locations (e.g. Synology Diskstations) are currently broken due to a compatibility-breaking change in the SCP protocol in recent Ubuntu versions (24.04 and later). A workaround is to add the option “-O” when calling SCP, but that’s not currently possible in Virtualmin, except by manually editing file /usr/share/webmin/virtual-server/virtual-server-lib-funcs.pl around line 7038 and then restarting webmin.
I use a Synology NAS device for storage, but any spare external storage will do. You will need to create a public SSH key for the root user as described above, and copy it to the authorized_keys file for the backup user on the NAS. Setting up a NAS is outside the scope of this tutorial, but I create a shared folder for this purpose in Control Panel > Shared Folder and a backup user in Control Panel > User & Group who only has access to that folder. Data “at rest” should always be encrypted, so make sure you have either volume encryption or shared folder encryption set up.
Webmin control panel settings can also be saved from Webmin > Backup Configuration Files > Scheduled backups. The filename I use for these is simply the month name backup_%B because it’s a fairly primitive backup with no rotation, and this effectively gives a 12 month history.
Virtualmin (and other control panels) have a limited number of backup options and you should have more than one backup, so I’ll discuss some other options for manual and automatic backups.
Database backups
Copying files and emails to a backup location is easy, but how do you backup database contents? Ubuntu has a package called automysqlbackup for this purpose. Install it with this command.
sudo apt install automysqlbackup
I change the default database backup location by editing configuration file /etc/default/automysqlbackup and pointing the BACKUPDIR setting to a folder inside the /home folder. This makes it easier to backup database contents using file backup utilities such as Duplicacy (described below).
BACKUPDIR="/home/automysqlbackup"
Set the ownership to root and permissions to 0600 on this folder and all subfolders, to prevent hosted sites viewing each others’ database backups.
Note that recent versions of Ubuntu no longer support /etc/mysql/debian.cnf and the “root” mysql user no longer needs a password if set up as described above. You can use the following settings instead:
USERNAME="root"
DBNAMES=`find /var/lib/mysql -mindepth 1 -maxdepth 1 -type d | cut -d'/' -f5 | grep -v ^mysql\$ | grep -v ^performance_schema$ | grep -v ^sys$ | tr \\\r\\\n ,\ `
Also, it’s advisable to change the CREATE_DATABASE option to no, so you can restore to a database with a different name. Otherwise, you can accidentally overwrite a live database with an old backup, which causes havoc.
CREATE_DATABASE=no
Other backup methods
The Virtualmin backup system can in theory send backups to Amazon S3 or Backblaze but I find them unreliable. I prefer to use Duplicacy for cloud backups as described in a blog post here. I use it to back up to spare OneDrive storage that is effectively free for me.
Your VPS host may offer snapshot backups (TransIP includes snapshots of the whole VPS every 4 hours in their BladeVPS/X4 plan, which are sometimes a lifesaver), but remember they are likely to vanish if your hosting provider does.
A final word about security
My no. 1 tip for keeping a VPS secure is to keep it constantly updated with security patches (including all WordPress plugins). Most hacks happen through known vulnerabilities that are easily exploited.
My no. 2 tip is to set up daily off-site backups, including database contents. Human error (accidentally deleting files) is an even bigger threat than hackers and in any case it’s impossible to make a VPS 100% secure or reliable so you need to be able to recover quickly.
My no. 3 tip is to enforce long unique passwords and limit login attempts on every account that can upload files or modify the server. A typical 8 character “random” password can in some circumstances be cracked in less than 30 seconds but a 10 character password typically takes months.
My no. 4 tip is to keep an eye on log files using a utility like logcheck or logwatch and set up monitors at Webmin > Others > System and Server Status so you’re warned quickly if anything is wrong.
References
Locale – Ubuntu community help
Virtualmin installation instructions
Postfix Postscreen – How to enable and configure it to prevent spam
Setting Up DKIM And SRS In Postfix (but NOTE I no longer recommend SRS)
Preventing backscatter (non-delivery records) from forwarded spam (but NOTE I no longer recommend forwarding emails)
More VPS tutorials
Guide to starting a hosting business
Firstsiteguide Web Hosting Services Explained
The Perfect Server tutorials from HowtoForge, using ISPConfig as a control panel
Mozilla SSL Configuration Generator
Sender Policy Framework FAQ – Common mistakes
How big is your haystack? – Passwords need to be AT LEAST 12 characters